
Beanut Butter Caramel Minis

Tiny, irresistible peanut-butter cream cheese cups with a buttery graham crust and a homemade caramel drizzle—perfect for parties or an indulgent weeknight treat.
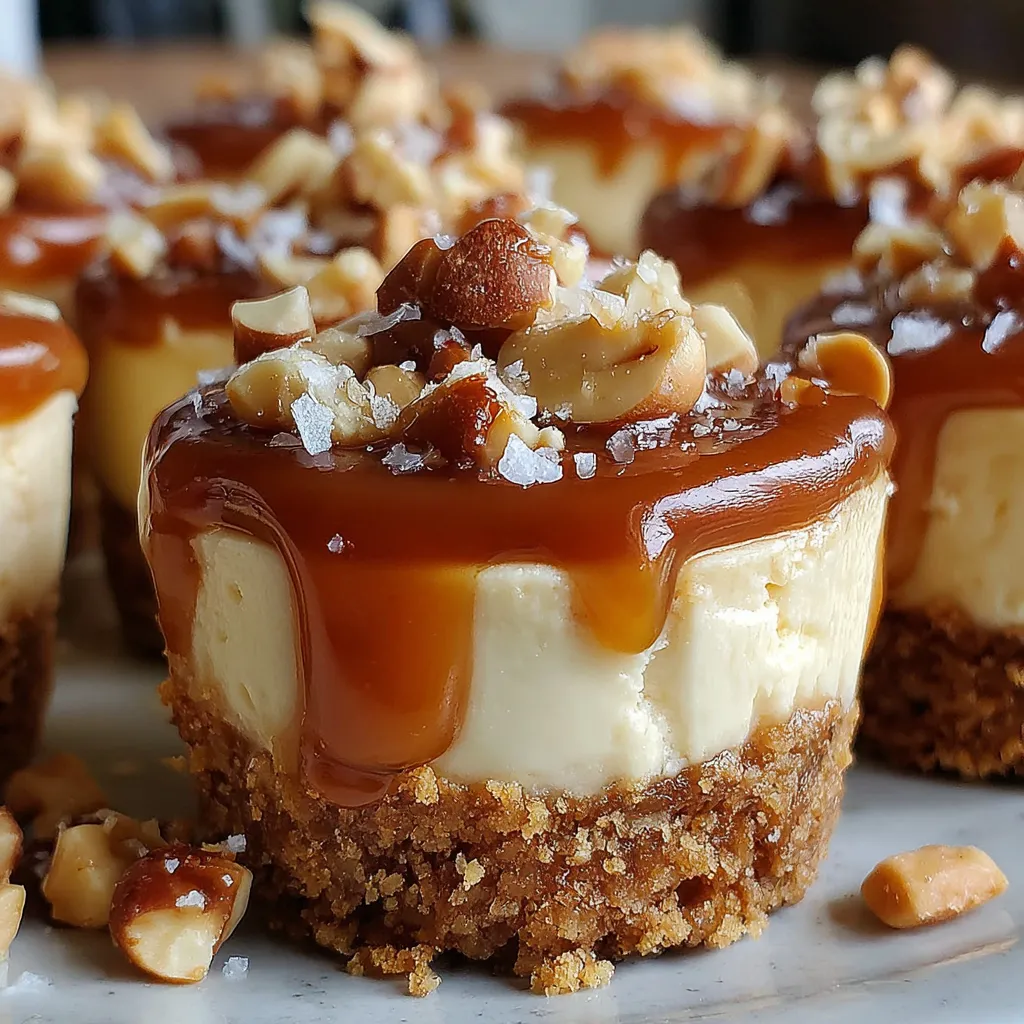
This little dessert has been my secret party trick for years. I first put these together late one autumn when I needed something small, sticky, and utterly comforting for a gathering where guests wanted bite-sized sweets. What started as a riff on classic peanut butter and cheesecake became a miniature sensation: a buttery graham crumb base, a luscious peanut-cream cheese center, and a warm, salted caramel that ties everything together. The balance of tangy cream cheese and nutty peanut butter with the crunch of roasted peanuts yields a texture parade in a single bite.
I discovered the combination while tinkering with pantry staples on a rainy afternoon. The result was so addictive that my family insisted I call them “Beanut Butter Caramel Minis,” a silly name that stuck because everyone wanted more. These are special because they travel well, freeze beautifully, and hit the nostalgic spot where childhood peanut butter meets grown-up caramel. Expect creamy centers that wobble slightly when you pull them from the oven and then set into buttery perfection after chilling.
Why You'll Love This Recipe
- Made in mini portions for easy portion control and great for parties—about 16 mini cups from this recipe, each a perfectly balanced bite.
- Uses pantry staples: graham crumbs, one block of cream cheese (8 oz), peanut butter, and simple caramel ingredients—no specialty shops required.
- Quick to assemble: active prep is around 20 minutes and the bake time is short; you can chill them overnight for make-ahead convenience.
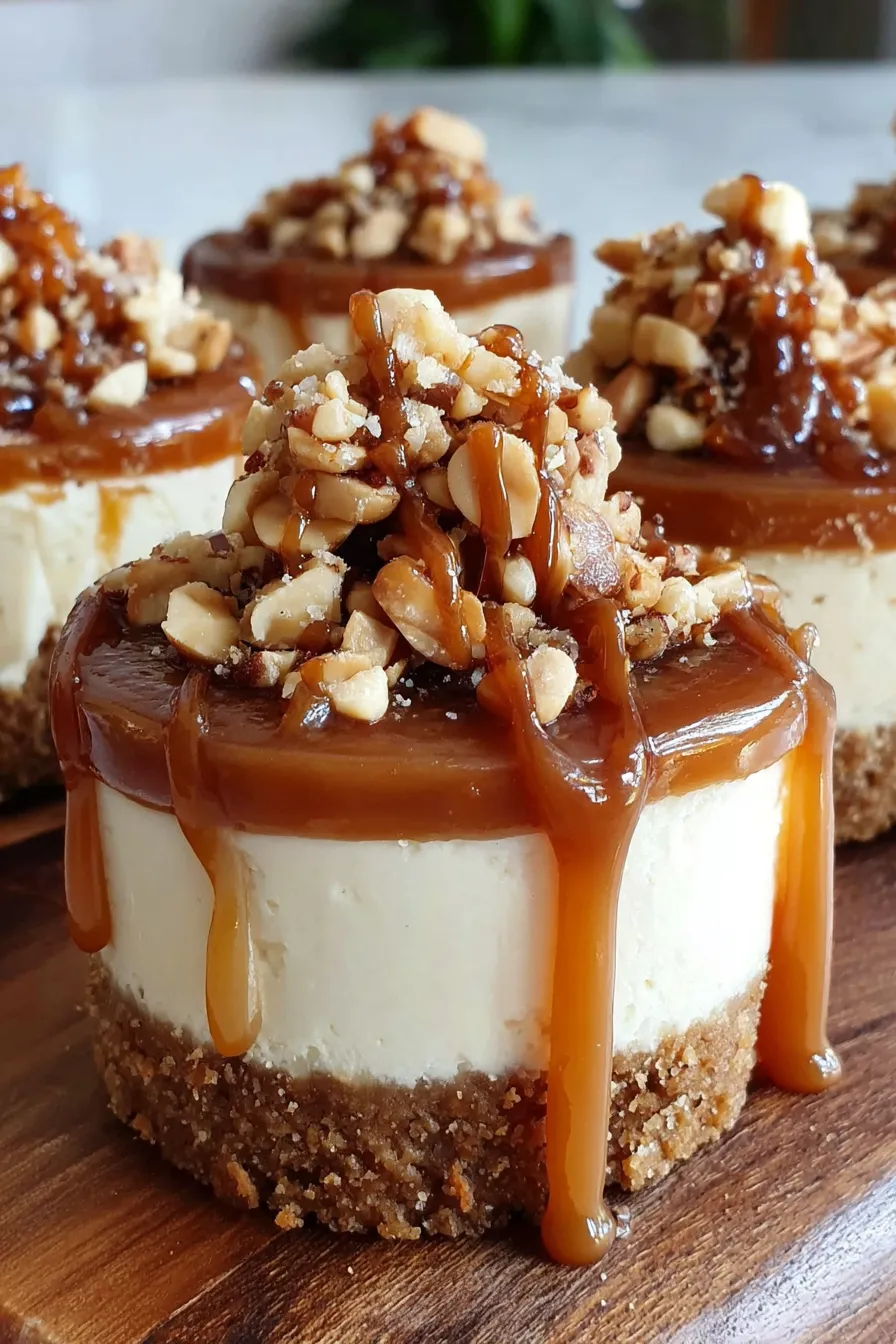
- Flexible toppings: the warm caramel can be salted or left sweet, and chopped roasted peanuts add crunch and contrast to the silky filling.
- Freezable and portable—freeze for up to 3 months (see storage tips) and bring to potlucks without worrying about slicing or serving.
- Kid- and adult-approved: the familiar peanut butter flavor pleases picky eaters, while the caramel and cream cheese add sophistication for grown-ups.
In my house these fly off the platter. At a summer barbecue my cousin stacked two on a napkin and declared them “the most dangerous thing” because he couldn’t stop eating them. That kind of reaction is why I always keep the ingredients on hand—so a spontaneous batch is just minutes away.
Ingredients
- Graham cracker crumbs: Use about 1 cup of finely crushed graham crackers (store brands work fine). Fine crumbs pack better and form a sturdier little crust—I like Honey Maid or a comparable store brand.
- Melted unsalted butter: 1/4 cup (4 tablespoons) melted. Unsalted gives you control of the final salt level; if using salted, omit the optional pinch of sea salt in the caramel.
- Granulated sugar: 3 tablespoons for the crust. This helps the crumbs brown slightly and sets the crust.
- Cream cheese: 8 ounces (one standard block), softened to room temperature so it whips smooth—Philadelphia is a classic choice.
- Creamy peanut butter: 1/2 cup (about 4 ounces). Choose a smooth, spreadable jar for the creamiest texture—Jif, Skippy, or natural brands are all fine.
- Granulated sugar for filling: 1/3 cup. This sweetens the cream cheese without overpowering the peanut flavor.
- Large egg: One egg helps bind the filling and gives a silky texture when baked gently.
- Vanilla extract: 1 teaspoon to lift and round the flavors.
- Unsalted butter (for caramel): 4 tablespoons (1/4 cup). Real butter delivers the best caramel flavor.
- Brown sugar: 1/2 cup packed for the caramel—light or dark both work; dark gives deeper molasses notes.
- Heavy cream: 1/4 cup to make a glossy, pourable caramel. If you only have half-and-half, the sauce will be thinner but still tasty.
- Sea salt: A pinch, optional. Flaky salt like Maldon is a lovely finish, sprinkled just before serving.
- Roasted peanuts: 1/2 cup chopped for texture and a final nutty pop—unsalted or lightly salted depending on your preference.
Instructions
Prepare the oven and pan: Preheat the oven to 320°F. Line a mini muffin pan with paper liners. If you want easier removal, use non-stick liners or spray the cups lightly before placing liners. Make and bake the crust: Stir the graham crumbs (1 cup) with 3 tablespoons granulated sugar and 1/4 cup melted butter until evenly moistened. Press about 1 tablespoon of the mixture into the bottom of each lined mini cup so the crust is compact—use the back of a small spoon for even pressure. Bake for 5–7 minutes until fragrant and slightly darker. Cool completely on a wire rack before filling. Whip the filling: In a mixing bowl, beat 8 oz softened cream cheese until smooth and lump-free. Add 1/2 cup creamy peanut butter, 1/3 cup sugar, the egg, and 1 teaspoon vanilla; beat until fully combined and silky. Scrape the bowl so there are no streaks of unmixed cream cheese. Fill and bake: Spoon the filling into each crusted cup, filling to about three-quarters full. Smooth the tops gently with a wet spatula. Bake at 320°F for 15–18 minutes until the edges appear set and the centers still wobble lightly when you jiggle the pan. Remove and cool to room temperature, then chill in the refrigerator for at least 2 hours or overnight for best results. Make the caramel: In a small saucepan over medium heat, melt 4 tablespoons butter with 1/2 cup packed brown sugar, stirring until the sugar dissolves. Pour in 1/4 cup heavy cream and simmer, stirring, until the mixture thickens slightly and becomes glossy—about 2–3 minutes. Remove from heat and add a pinch of sea salt if using. Let cool slightly so it thickens but remains pourable. Assemble and finish: Drizzle a spoonful of slightly cooled caramel over each chilled mini. Sprinkle with chopped roasted peanuts and, if desired, a flake of sea salt. Serve directly from the fridge for a cool, creamy bite that contrasts with the warm-charm aroma of the caramel.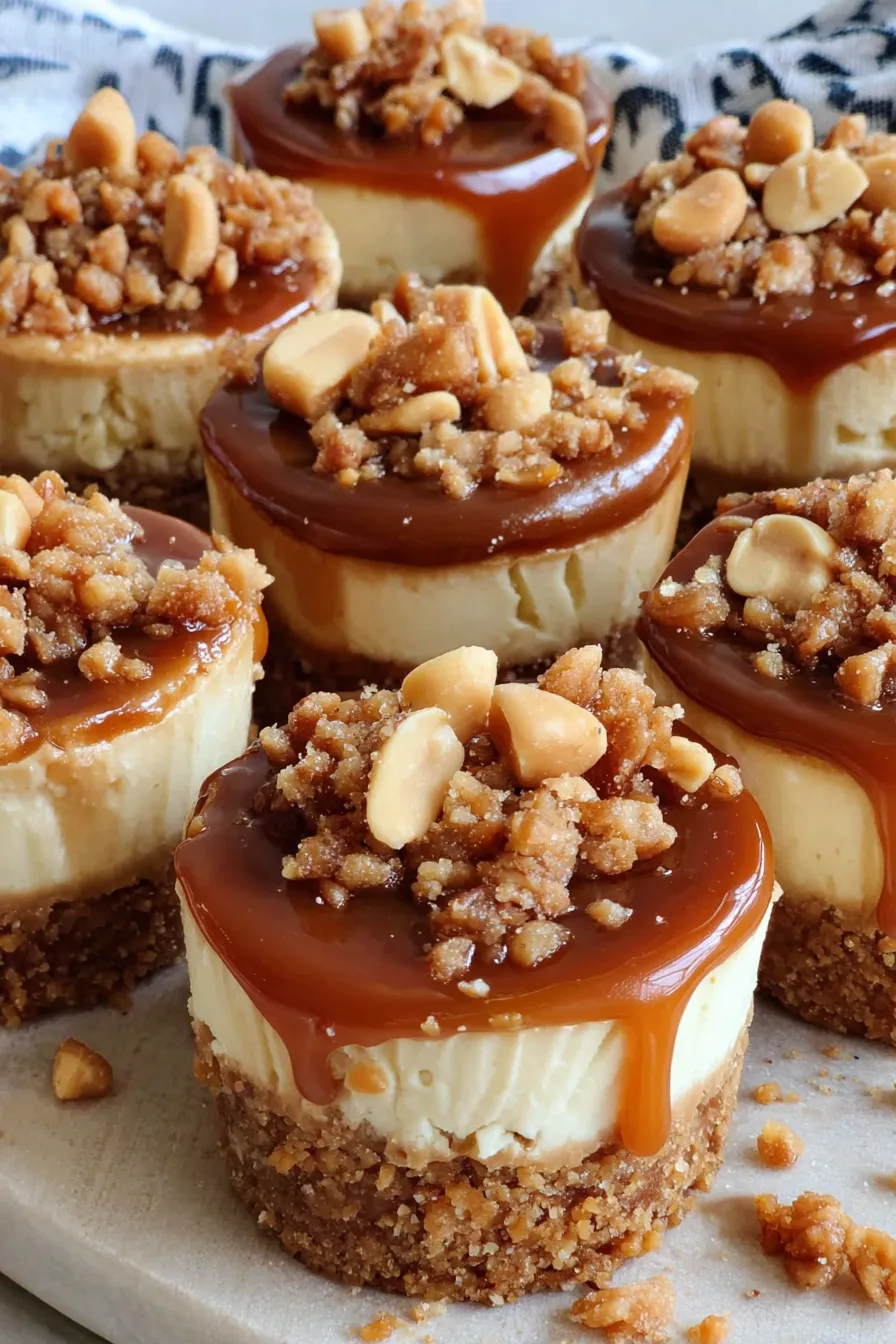
You Must Know
- High in protein relative to many sweets thanks to peanut butter and cream cheese, but also energy-dense—each mini is a rich treat.
- Chill fully for at least 2 hours so the centers set cleanly; they slice and pop out much easier when cold.
- These freeze well in an airtight container for up to 3 months—thaw in the fridge before serving and re-drizzle with caramel if needed.
- Salt balances sweetness—if your peanut butter is salted, reduce additional salt to taste; toasted peanuts add savory contrast.
What I love most is how portable and versatile these are. I once shipped a dozen to a friend across state lines (carefully packed) and they arrived intact—still creamy and delicious. The caramel seals the top and gives a polished finish that guests always comment on.
Storage Tips
Store chilled minis in a single layer in an airtight container in the refrigerator for up to 5 days. If stacking, place parchment between layers to protect the caramel finish. For longer storage, freeze in a rigid container or on a tray until solid, then transfer to a freezer-safe bag—label with date and use within 3 months. Thaw overnight in the fridge and refresh the caramel drizzle just before serving to restore gloss and texture.
Ingredient Substitutions
If you need to avoid gluten, replace graham crumbs with gluten-free cookie crumbs (brown rice or oat-based cookies work nicely) but expect a slightly different crumb texture. For a lower-sugar version, reduce filling sugar to 2 tablespoons and use a caramel made with coconut cream and a sugar alternative—note the flavor profile will shift. Swap roasted peanuts for chopped toasted almonds if you're avoiding peanuts (though the peanut butter flavor will be absent).
Serving Suggestions
Serve chilled on a small platter with napkins—these are finger-food friendly. Pair with strong coffee or a dessert wine for contrast. Garnish with a small sprig of mint for color or a dusting of cocoa powder if you prefer a chocolatey accent. For brunch, offer alongside sliced fruit to cut the richness.
Cultural Background
This bite-sized creation blends classic American flavors: graham cracker crusts come from 19th-century American baking, cream cheese rose to prominence in New York-style cheesecakes, and peanut butter is a beloved pantry staple. Combining these elements with a simple caramel is a modern, playful nod to familiar comfort foods presented in miniature form.
Seasonal Adaptations
In summer, lighten the caramel by adding a few tablespoons of citrus zest (orange or lime) to cut through richness. In winter, swap peanut butter for a spiced almond butter and use dark brown sugar for a deeper caramel note. For holiday gatherings, top with crushed toffee or a few festive sprinkles.
Meal Prep Tips
Make the crust and filling a day ahead and keep them chilled; fill and bake on the event day for maximum freshness. The caramel can be made hours ahead and kept warm in a thermos or gently reheated—do not boil after adding the cream or it can separate. Pack finished minis in a cooler for travel and keep refrigerated until serving.
These little treats are deceptively simple but endlessly satisfying—perfect for sharing, gifting, or just indulging. Try them once and you’ll understand why they’ve become a household favorite.
Pro Tips
Soften cream cheese to room temperature for the smoothest filling — cold cream cheese will make the batter lumpy.
Press the crust firmly with the back of a spoon to avoid a crumbly base after baking.
Chill the filled cups at least 2 hours so the centers set cleanly; overnight chilling yields the best texture.
If caramel thickens too much, gently warm it with a tablespoon of cream to loosen before drizzling.
This nourishing beanut butter caramel minis recipe is sure to be a staple in your kitchen. Enjoy every moist, high protein slice — it is perfect for breakfast or as a wholesome snack any time.
FAQs about Recipes
Can I make these ahead of time?
Yes — once fully chilled you can remove them from the liners carefully and store in a single layer in an airtight container in the fridge for up to 5 days.
How do I freeze and thaw these?
Freeze on a tray until firm, then transfer to a freezer-safe bag. Thaw in the refrigerator overnight before serving.
Tags
Beanut Butter Caramel Minis
This Beanut Butter Caramel Minis recipe makes perfectly juicy, tender, and flavorful steak every time! Serve with potatoes and a side salad for an unforgettable dinner in under 30 minutes.
Ingredients
Crust
Filling
Caramel & Topping
Instructions
Prepare and preheat
Preheat oven to 320°F (160°C). Line a mini muffin pan with paper liners and set aside.
Make crust and bake
Combine graham crumbs, sugar, and melted butter. Press about 1 tablespoon into each lined cup and bake for 5–7 minutes. Cool completely.
Blend filling
Beat softened cream cheese until smooth. Add peanut butter, sugar, egg, and vanilla and mix until creamy and well combined.
Fill and bake
Spoon the filling into each crusted cup, filling to three-quarters. Bake at 320°F for 15–18 minutes until edges are set and centers still wobble. Cool and refrigerate at least 2 hours.
Make caramel
Melt butter with brown sugar over medium heat, stir in heavy cream and simmer until slightly thickened. Add a pinch of sea salt if desired and cool slightly before drizzling.
Assemble and serve
Drizzle caramel over chilled minis, sprinkle with chopped peanuts and sea salt if using, and serve chilled.
Last Step: Please leave a rating and comment letting us know how you liked this recipe! This helps our business to thrive and continue providing free, high-quality recipes for you.
Nutrition
Did You Make This?
Leave a comment & rating below or tag
@epicula on social media!
Categories:
You might also like...

Mississippi Mud Brownies
Ultra-fudgy brownies crowned with toasted mini marshmallows and warm cocoa icing, with molten chocolate pockets in every bite.

Buttery Pecan Pie Bars
Buttery shortbread crust topped with a gooey brown sugar pecan filling. Just 10 minutes to prep for bakery-worthy bars with irresistible crunch.

Crack-Free Pumpkin Cheesecake
Ultra-creamy pumpkin cheesecake with a graham crust, bakes without cracks, and shines with caramel and rum-kissed whipped cream.
Did You Make This?
Leave a comment & rating below or tag @epicula on social media!
Rate This Recipe
Share This Recipe
Enjoyed this recipe? Share it with friends and family, and don't forget to leave a review!
Comments (1)
This recipe looks amazing! Can't wait to try it.
Comments are stored locally in your browser. Server comments are displayed alongside your local comments.

Hi, I'm Olivia!
What's Popular

30-Minute Meals!
Join to receive our email series which contains a round-up of some of our quick and easy family favorite recipes.