
Christmas Oreo Tree Cookies

Festive Oreo cookies transformed into little Christmas trees with white and green chocolate, candy star toppers, and a chocolate jimmies trunk — perfect for holiday parties and baking with kids.
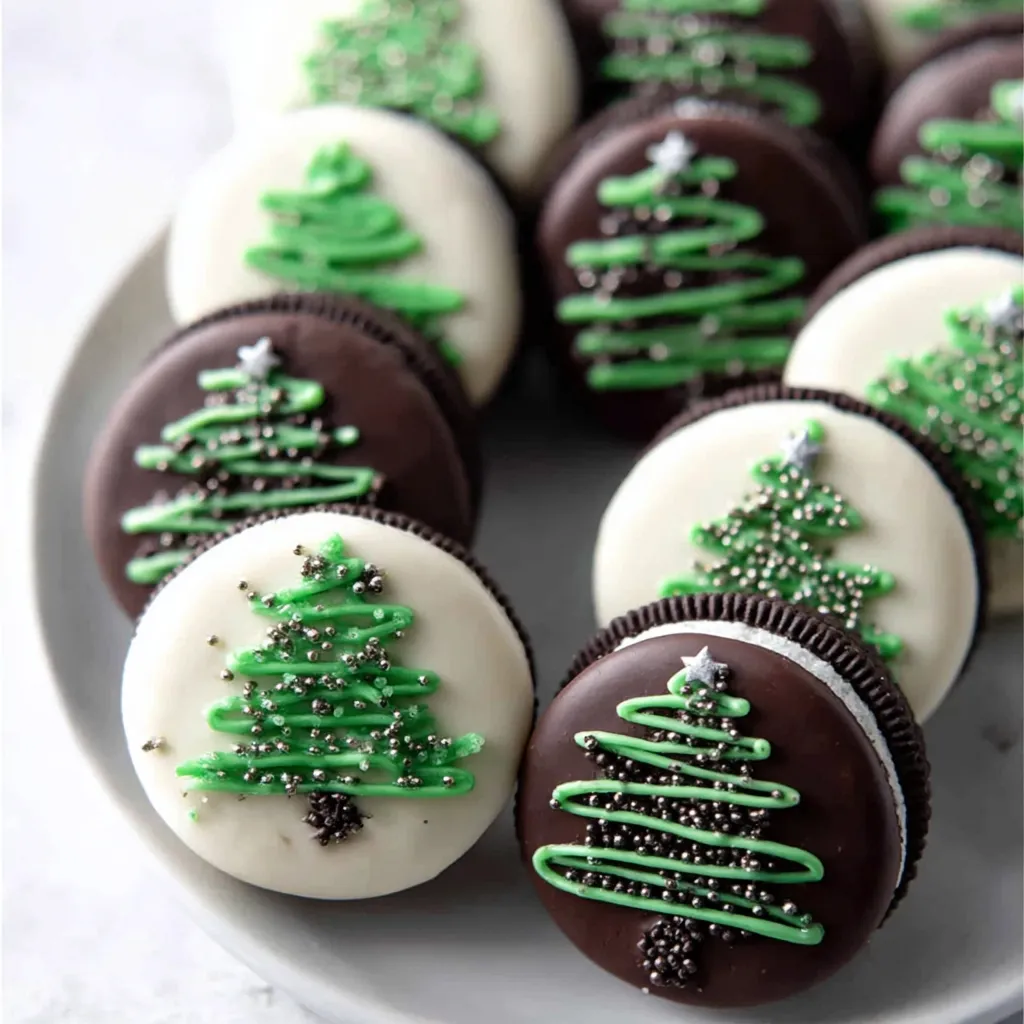
This little holiday project started the year my niece insisted on helping with every part of cookie day. I wanted something fast, cheerful, and forgiving enough for small hands, so I turned a bag of classic sandwich cookies into miniature Christmas trees. The result is exactly what I hoped for: bright green tree shapes sitting on a white snowy background of melted chocolate, finished with a shiny candy star and a slender trunk of chocolate jimmies. The contrast of crisp cookie, smooth white coating, and melt-in-your-mouth green chocolate makes each bite playful and nostalgic.
I first tested this idea when I had an impromptu cookie swap to attend and only a few hours to prepare. These cookies came together in under an hour, looked charming on a platter, and traveled beautifully. They’re great for holiday school parties, last-minute gifts in a decorative tin, or a simple weekend afternoon activity. The technique is simple: dip, pipe, and decorate. Even if you’re new to working with melting wafers, the process is forgiving — a gentle temper with short microwave bursts and frequent stirring will give you smooth, pipeable chocolate every time.
Why You'll Love This Recipe
- Fast, kid-friendly project that produces 15 festive cookies in about 45 minutes from start to finish.
- Uses pantry-ready ingredients: store-bought sandwich cookies and melting chips — no baking required.
- Very adaptable: switch colors, toppers, or trunk decorations to match a holiday theme or party palette.
- Perfect for make-ahead gifting: cookies set completely and hold their shape in an airtight tin for several days.
- Little hands love piping the trees and adding the stars, while adults can handle the melting and dipping for a collaborative bake.
- Low-effort yet high-impact presentation — they look like they took much longer to make than they do.
In my kitchen these cookies became a hit because they combine visual charm with nostalgic flavors. Family members, from toddlers to grandparents, have asked for the recipe after seeing the platter. They also travel well to potlucks and bring a festive touch to cookie exchanges.
Ingredients
- Oreos (15 cookies): Use standard sandwich cookies (regular Oreo or store brand). Choose classic chocolate with white filling for the best contrast — double-stuff will still work but may be slightly taller and trickier to dip.
- White melting chips (6 ounces): Choose confectionery coating or candy melts labeled for dipping and melting; I like Wilton’s white candy melts for smooth coverage. These form the snowy base that makes the green tree pop.
- Green melting wafers (3 ounces): Pick a bright forest green for a traditional look or a glittery green for extra sparkle. Use quality wafers that melt smoothly without seizing.
- Candy stars (15): Small sugar star toppers about 1/2 inch in diameter — place one on each tree peak while the green chocolate is still wet.
- Chocolate jimmies (1/4 cup): Optional for trunks — chocolate jimmies or small sprinkles make tidy trunks with no extra piping required.
- Tools and extras: Parchment paper, a baking sheet, microwave-safe bowls, a piping bag or a small zip-top bag with a tiny cut in the corner, and a spoon or fork for dipping.
Instructions
Prepare the work surface: Line a baking sheet with parchment paper and set it aside. Group all decorations within reach: candy stars in a small bowl, jimmies in another. Having everything prepped prevents rushed decorating once the chocolate is melted. Melt the white coating: Place the 6 ounces of white melting chips in a microwave-safe bowl. Heat on medium power for 30 seconds, then stir briskly. Continue heating in 15-second bursts if needed, stirring between each burst until the coating is smooth and glossy. Avoid overheating to prevent graininess; the chocolate should be pourable but not thin-runny. Dip the cookies: Holding an Oreo by the edge, dip it halfway into the melted white coating so the top half is covered and the bottom edge remains exposed. Allow excess coating to drip back into the bowl, then place the cookie on the parchment-lined sheet. If any drips form along the edge, gently smooth with the back of a small spoon. Work quickly so the white coating remains wet for adhering the green decoration later. Melt the green wafers: In a clean microwave-safe bowl, melt the 3 ounces of green wafers using the same method: 30 seconds, stir, then 10 to 15 second bursts until fully melted and smooth. If the wafers are slightly thick, add a drop of neutral oil or vegetable shortening to reach a pipeable consistency, but only if necessary. Pipe the tree shapes: Transfer the green coating into a piping bag or a zip-top bag with a very small corner cut. On each cookie’s white-coated half, pipe a triangular tree shape using a short back-and-forth motion so the green forms three or four tiers that taper to a point. Keep the green lines slightly raised for texture. Practice one or two on parchment if you need to find the right pressure and motion. Add toppers and trunks: While the green is still wet, press a candy star gently onto the tip of each tree. Use about four chocolate jimmies stacked vertically to suggest a trunk beneath each tree, or press several jimmies side-by-side to form a slender trunk. If any decorations fall off, simply reheat and remelt a tiny dab of white coating to use as edible glue. Set and store: Allow the decorated cookies to set at room temperature until fully firm, about 20 to 30 minutes, or speed it up by placing the tray in the refrigerator for 10 minutes. Store finished cookies in an airtight container in a single layer or separated with parchment to avoid smudging.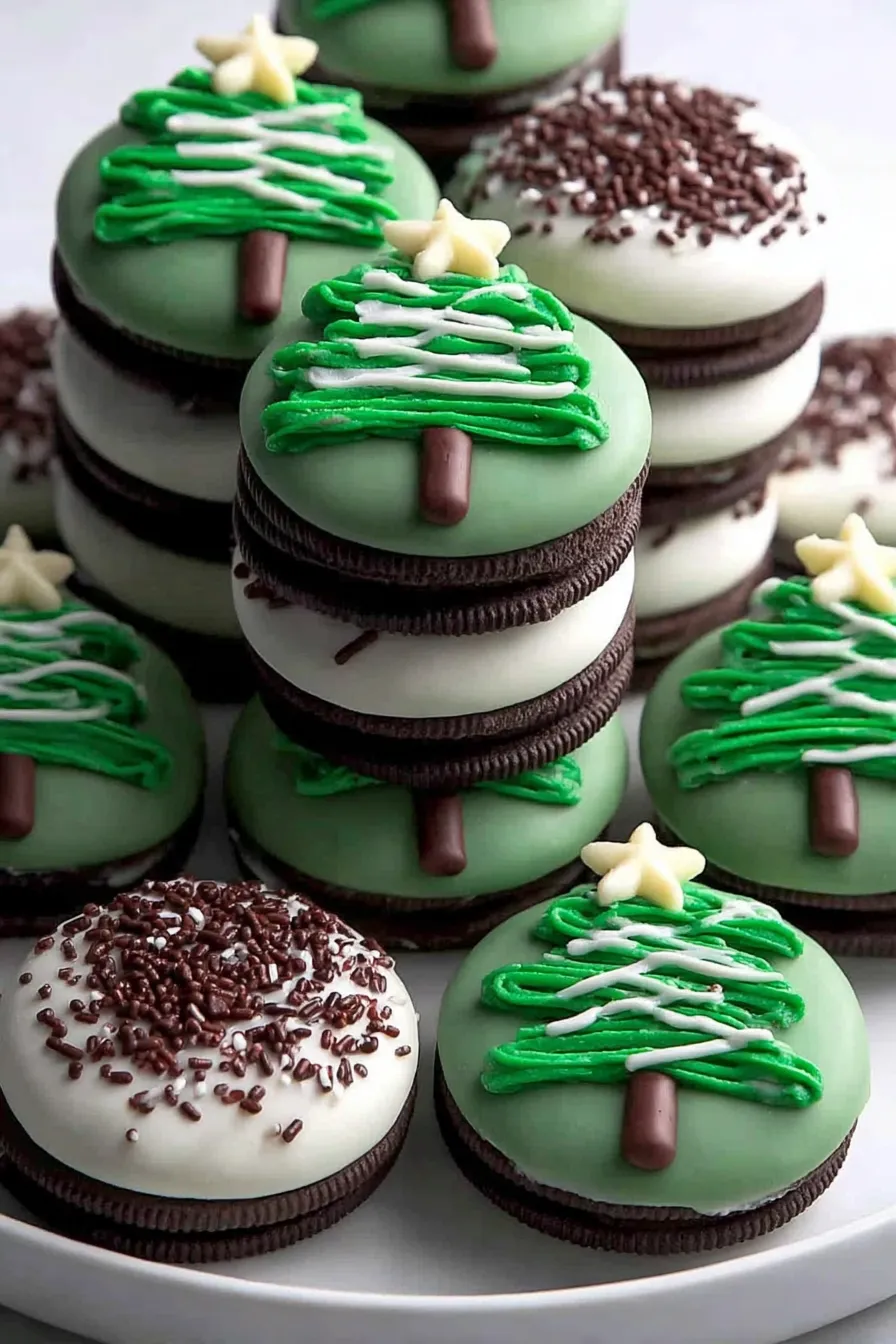
You Must Know
- These treats are quick to prepare and best served fresh within 3 to 5 days when stored in an airtight container at cool room temperature or in the refrigerator for up to 7 days.
- Melting wafers set faster and are less temperamental than couverture chocolate, which makes them ideal for dipping and piping in small at-home projects.
- The cookies do not require baking, making this a perfect no-oven holiday activity for families and parties.
- If you plan to freeze, layer cookies between sheets of parchment and freeze in an airtight container for up to 3 months; thaw in the refrigerator to avoid condensation on the decorations.
My favorite part is watching kids carefully add their stars and jimmies — they beam with pride when their creations make the platter. At one cookie swap, a neighbor asked if I’d made them professionally because the presentation looked so polished.
Storage Tips
Store the cookies in a single layer or separate layers with parchment paper to avoid smearing the decorations. At room temperature in an airtight tin, they’ll keep 3 to 5 days; refrigeration extends this to about one week but may dull the shine on candy melts. For longer storage, freeze in a rigid container for up to three months. To thaw, transfer the container to the refrigerator for a few hours, then bring to room temperature before serving to prevent condensation that can make the coatings sticky. Use a shallow, rigid container to protect delicate star toppers and trunks while frozen or transported.
Ingredient Substitutions
If you prefer darker trees, substitute the green wafers with dark or milk chocolate tinted with oil-based green coloring or use tinted white melts. For a dairy-free version, use vegan sandwich cookies and dairy-free candy coating labeled vegan; be aware texture may vary. If you cannot find candy stars, small round sprinkles, edible pearls, or a dab of yellow icing piped as a star will work. Chocolate jimmies can be replaced with pretzel sticks for a salty trunk or piped brown chocolate for a tidier look. If you want a gluten-free option, select certified gluten-free sandwich cookies.

Serving Suggestions
Arrange the cookies on a white or silver platter to mimic a snowy table; add sprigs of fresh rosemary or pine for a fragrant, evergreen accent. Serve alongside hot cocoa, mulled cider, or a simple platter of other small cookies for a cookie-exchange spread. For gift-giving, stack cookies in a small box with parchment between layers and tie with a festive ribbon. These bite-sized treats also pair well with coffee or tea and make charming place-setting favors when wrapped in cellophane and tagged with guest names.
Cultural Background
Decorating cookies as miniature trees draws on classic Christmas iconography prevalent in Western holiday baking — trees, stars, and edible trunks echo the decorated evergreen that is central to many seasonal celebrations. Adapting store-bought cookies into decorated holiday confections reflects a long tradition of home cooks repurposing pantry staples to make celebratory dishes accessible and joyful. While not tied to a single regional recipe, these decorated sandwich cookies capture the universal holiday spirit of creativity, sharing, and making sweets with family.
Seasonal Adaptations
For a winter-white theme swap the green for pale blue or silver edible dust; for a Hanukkah table consider blue and white coatings with silver stars. Around Valentine’s Day, use pink wafers and heart sprinkles to create a different holiday motif. For New Year’s Eve, make trees in metallic green with gold star toppers. The technique stays the same — dip, pipe, and decorate — but color and topper choices let you adapt quickly to any season or celebration.
Meal Prep Tips
Prep the dipping and piping stations in advance: melt the coatings just before you begin and have the piping bag and decorations ready. You can pre-dip all cookies in white coating, let them set, then pipe green trees in a separate session to spread the work across two days. Store dipped cookies in one container and decorations in small bags until you’re ready to pipe and finish. This approach makes hosting less stressful while letting you produce a visually consistent batch when time is tight.
These festive Oreo trees are a small tradition that brings big smiles. Whether you make a single tray for a casual gathering or a dozen for gifting, the process is simple, the results are delightful, and the memories — especially with children helping — are the best part. Enjoy making them your own and happy holidays!
Pro Tips
Use short microwave bursts and stir frequently to avoid overheating the candy melts.
If the green coating is too thick for piping, thin with a small drop of neutral oil or vegetable shortening.
Work in small batches to keep coatings at a pipeable temperature and prevent them from setting in the bowl.
Place the tray in the fridge for 5 to 10 minutes to speed setting but return to room temperature before serving to avoid condensation.
This nourishing christmas oreo tree cookies recipe is sure to be a staple in your kitchen. Enjoy every moist, high protein slice — it is perfect for breakfast or as a wholesome snack any time.
Tags
Christmas Oreo Tree Cookies
This Christmas Oreo Tree Cookies recipe makes perfectly juicy, tender, and flavorful steak every time! Serve with potatoes and a side salad for an unforgettable dinner in under 30 minutes.
Ingredients
Cookies
Chocolate and Decorations
Tools
Instructions
Prepare the pan
Line a baking sheet with parchment paper and set aside. Arrange decorations and tools so they are within reach before you begin decorating.
Melt white chocolate
Place 6 ounces of white melting chips in a microwave-safe bowl. Heat for 30 seconds, stir, then continue heating in 10 to 15 second intervals, stirring until smooth and pourable. Avoid overheating.
Dip the Oreos
Holding an Oreo by the edge, dip it halfway into the melted white coating. Let excess drip back into the bowl and set the cookie on the parchment to create a snowy base for piping.
Melt green wafers
Melt 3 ounces of green wafers in a separate bowl using 30 second bursts, stirring between each burst until fully melted and smooth. Thin slightly if necessary for piping.
Pipe tree shapes
Transfer green coating to a piping bag or zip-top bag with a very small corner cut. Pipe a tiered triangular tree on the white portion of each cookie using short back-and-forth motions for texture.
Add toppers and trunks
Place a candy star at the top of each tree while the green chocolate is wet. Press chocolate jimmies below the tree to form trunks or pipe small brown trunks if preferred.
Set and store
Allow cookies to set at room temperature for 20 to 30 minutes or chill briefly in the refrigerator. Store in an airtight container for up to 5 days at room temperature or up to 7 days refrigerated.
Last Step: Please leave a rating and comment letting us know how you liked this recipe! This helps our business to thrive and continue providing free, high-quality recipes for you.
Nutrition
Did You Make This?
Leave a comment & rating below or tag
@epicula on social media!
Categories:
You might also like...

Mississippi Mud Brownies
Ultra-fudgy brownies crowned with toasted mini marshmallows and warm cocoa icing, with molten chocolate pockets in every bite.

Buttery Pecan Pie Bars
Buttery shortbread crust topped with a gooey brown sugar pecan filling. Just 10 minutes to prep for bakery-worthy bars with irresistible crunch.

Crack-Free Pumpkin Cheesecake
Ultra-creamy pumpkin cheesecake with a graham crust, bakes without cracks, and shines with caramel and rum-kissed whipped cream.
Did You Make This?
Leave a comment & rating below or tag @epicula on social media!
Rate This Recipe
Share This Recipe
Enjoyed this recipe? Share it with friends and family, and don't forget to leave a review!
Comments (1)
This recipe looks amazing! Can't wait to try it.
Comments are stored locally in your browser. Server comments are displayed alongside your local comments.

Hi, I'm Olivia!
What's Popular

30-Minute Meals!
Join to receive our email series which contains a round-up of some of our quick and easy family favorite recipes.