
Classic Apple Tarte Tatin

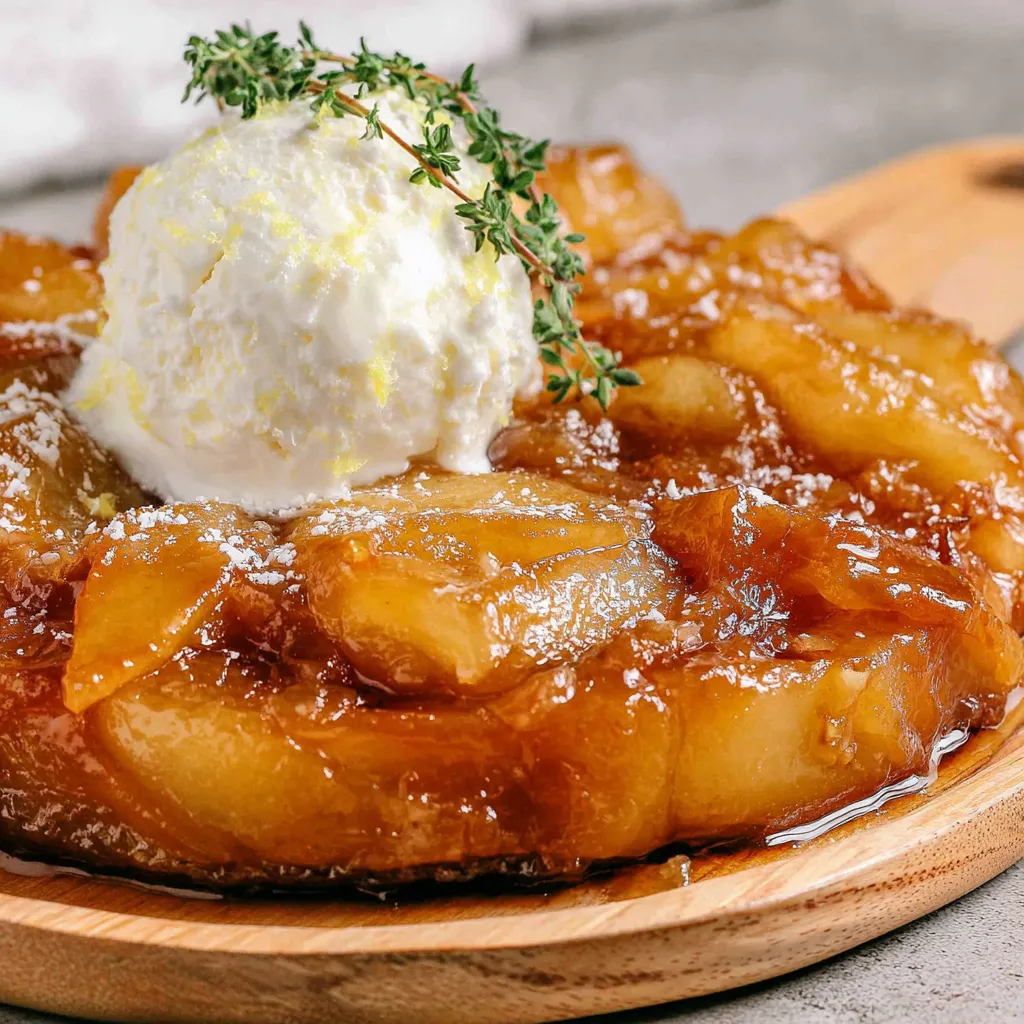
An upside-down caramelized apple tart with glossy caramel and crisp puff pastry — a simple but stunning French classic that's perfect for sharing.
This upside-down caramel apple tart has been a signature of my kitchen for years. I first learned this technique on a rainy afternoon when a bag of slightly tired apples and a sheet of puff pastry demanded attention. The combination of fragrant caramel and tart apples, finished with a golden, crisp crust, felt like a small triumph — simple pantry ingredients elevated by timing and technique. Every time I make it, it conjures the same warm, convivial atmosphere: the caramel sizzling in the pan, the house filling with deep brown sugar notes, and the first warm slice melting with vanilla ice cream.
What makes this version special is the balance: we aim for apples that are soft but still hold their shape, a caramel that is glossy without being bitter, and a pastry that stays crisp under the caramel for contrast. I prefer using firm, tart apples like Granny Smith to balance the sweetness of the caramel, but the method is forgiving. With a few careful steps you can produce a dramatic dessert with a glossy finish that looks far more difficult than it really is. Once you master the timing of the caramel and how to tuck the pastry, this becomes a dessert you will make whenever you want to impress with minimal fuss.
Why You'll Love This Recipe
- Uses common pantry staples and a single sheet of store-bought puff pastry for an elegant finish with minimal hands-on time.
- Ready in roughly 1 hour from start to finish: about 25 minutes active preparation and 35 to 50 minutes of oven time depending on your pan.
- Make-ahead friendly: bake the apples and caramel ahead, cool and refrigerate, then top with pastry and bake when ready to serve.
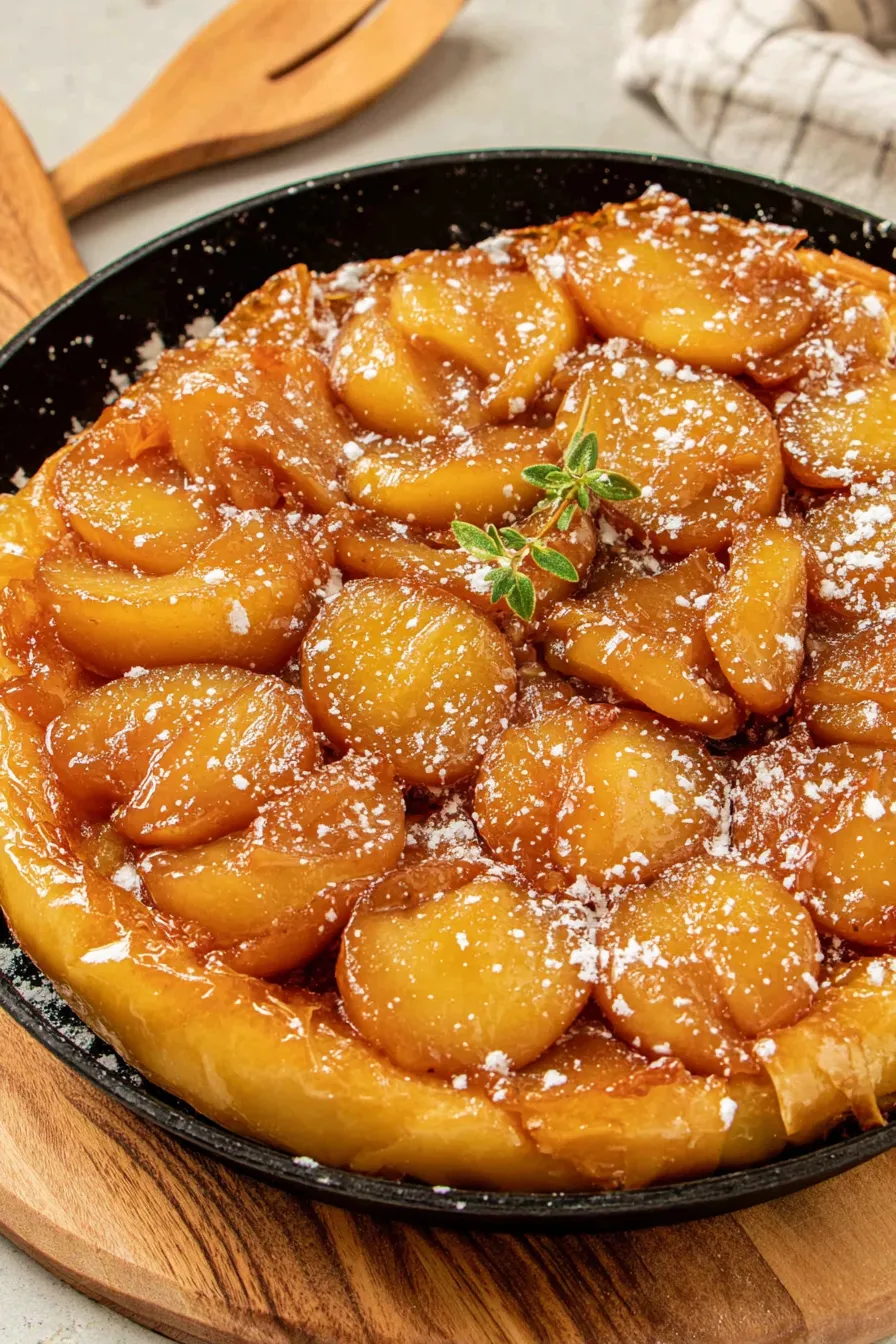
- Visually impressive: inverted presentation yields glossy, caramel-coated apples arranged like a flower — perfect for dinner parties.
- Flexible to dietary adjustments: swap butter for plant-based margarine for a dairy-light version, or use gluten-free puff pastry for a wheat-free alternative.
- Minimal equipment: a heavy 9-inch ovenproof skillet or tarte tatin pan is all you need for classic results.
When I first served this to friends, they asked how long I had practiced such a flawless dessert — they were surprised to hear it came together from a single sheet of pastry and a handful of apples. My partner still remembers how the caramel caught the light when I flipped it and how proud we both felt when everyone reached for seconds. The technique feels theatrical, but it rewards simple care and attention.
Ingredients
- Apples: 5 to 6 medium firm apples such as Granny Smith. Choose apples that are crisp and tart to provide contrast to the caramel; avoid mealy or overripe fruit.
- Lemon juice: 1 tablespoon plus a little extra for tossing the apples. Fresh lemon juice prevents discoloration and brightens the caramel flavors.
- Granulated sugar: 3/4 cup. Granulated sugar melts and caramelizes predictably to form the glossy base; caster sugar works too if you have it.
- Unsalted butter: 4 tablespoons (1/4 cup). Use real butter for the best flavor; if using salted butter, reduce or omit the added salt.
- Salt: 1/4 teaspoon. A small touch of salt rounds and deepens sweetness in the caramel.
- Puff pastry: 1 sheet (about 9 ounces) thawed if store-bought. Use the rectangular or square sheet rolled to an 11 to 12 inch circle; keep it cold until you are ready to top the apples.
Instructions
Prepare the apples: Peel, core, and halve 5 to 6 medium apples. As you work, toss or sprinkle them with a tablespoon of fresh lemon juice to prevent browning and to add brightness. Aim for uniform halves so they cook evenly; thicker halves will hold shape while still absorbing caramel. Make the caramel: Place a heavy 9-inch ovenproof skillet over medium heat. Add 3/4 cup sugar, 4 tablespoons butter, and 1 tablespoon lemon juice. Stir gently until the sugar dissolves, then let it bubble without stirring too much. Watch closely: when it turns a light golden amber, swirl the pan to even out color. If butter separates, whisk briefly off the heat to re-emulsify. Remove from heat and stir in 1/4 teaspoon salt. Arrange the apples: Place the apple halves cut-side up packed tightly into the caramel in concentric circles. Apples will shrink while baking, so pack them snugly to create an even, full base. If you need more layers, stand the halves on their cut edges to layer, but keep the top layer neat for presentation. Bake the apples: Transfer the pan to a 350°F oven and bake for about 20 minutes. The apples should be only partially cooked at this stage — tender at the edges but still holding shape. Remove and let cool to room temperature before adding pastry; this prevents the pastry from melting into the caramel. Prepare the pastry: Roll chilled puff pastry into an 11 to 12 inch circle, slightly larger than the skillet, and prick it all over with a fork. This prevents large air pockets and ensures even baking. Keep the pastry cold until the apples are ready to be covered. Top and bake until golden: Carefully drape the pastry over the cooled apples, tucking the edges down around the fruit inside the skillet. Return to a 375°F oven and bake for 25 to 30 minutes until the pastry is deep golden brown and crisp. Rest and invert: Let the tart rest for 15 minutes after baking. Check the pan for excess liquid and spoon out any watery juices — save them. Place a serving plate over the skillet and invert while still warm so the caramel pours over the apples in a glossy coat. If reserved juices thicken as they cool, brush them on for extra sheen. Serve: Slice and serve warm with lightly sweetened whipped cream or vanilla ice cream. Rewarm slices gently at 300°F for about 10 minutes if you make them ahead.
You Must Know
- The tart keeps well refrigerated for up to 3 days; reheat slices at 300°F for about 10 minutes to revive the crispness.
- Caramel color is the best indicator of flavor: aim for a deep golden amber, not dark brown, to avoid bitterness.
- Firm, tart apples hold their shape and offer contrast to the sweet caramel; softer varieties can collapse into a compote.
- Use an ovenproof skillet with a tight fit; gaps allow caramel to run and make flipping trickier.
- Saved pan juices thicken as they cool and make an excellent glossy glaze; don’t discard them.
My favorite thing about this preparation is the small ritual of flipping the tart: it feels like the final act of a performance. Guests often comment on the caramel’s sheen and the neat floral pattern of the apples. Over the years I have learned to trust visual cues — the color of the caramel and the level of apple doneness — rather than the clock alone.
Storage Tips
Store leftover tarte Tatin covered in the refrigerator for up to three days. Use an airtight container or wrap the skillet or plate tightly with plastic wrap to prevent the pastry from absorbing odors. When reheating, place slices on a baking tray and warm in a 300°F oven for about 8 to 12 minutes to refresh the pastry’s crisp texture and release the caramel aroma. Avoid microwaving, which softens the pastry and makes the caramel syrupy rather than glossy.
Ingredient Substitutions
If you need to adapt ingredients, there are straightforward swaps. Replace unsalted butter with a plant-based margarine for a dairy-light version — flavor will be slightly different but still pleasing. For a lower-sugar option, reduce sugar by 2 tablespoons and compensate with a teaspoon of corn syrup or honey to help prevent crystallization. Use a gluten-free puff pastry sheet in place of standard pastry for a wheat-free alternative; note that texture may be slightly less flaky.
Serving Suggestions
Serve the tart warm with a spoonful of lightly sweetened whipped cream or a scoop of vanilla ice cream to balance the caramel’s intensity. For a more grown-up pairing, offer a small glass of calvados or a tawny port alongside slices. Garnish with a dusting of finely chopped toasted almonds or a few fresh mint leaves for color contrast. This dessert is perfect for holiday dinners, intimate gatherings, or as a show-stopping finale to a French-inspired menu.
Cultural Background
Originating in France, this upside-down tart became famous in the Loire Valley region in the 19th century. The technique of caramelizing fruit in the pan and covering it with pastry before baking is rustic and celebratory, reflecting farmhouse kitchens where seasonal fruit was transformed into a refined dessert. Over time it has evolved with regional variations: some versions use pears, others incorporate spices or spirits into the caramel. The theatrical flip to unmold the tart is central to its appeal and links the home kitchen to classical French patisserie techniques.
Seasonal Adaptations
In autumn, swap Granny Smith for Braeburn or Honeycrisp for a sweeter finish; in winter, add a pinch of ground cinnamon or star anise to the caramel for warmth. For a spring variation, use peeled peaches or apricots and reduce baking time slightly to keep them tender. For holiday occasions, add a teaspoon of orange zest to the caramel and finish with a scattering of toasted pecans for crunch and festive flavor.
Meal Prep Tips
For easier entertaining, caramelize and bake the apples ahead of time, cool, and refrigerate for up to 48 hours. When you are ready to serve, top with cold puff pastry and bake until golden. If you expect to transport the tart, cool fully, cover loosely, and invert onto the serving plate at your destination to refresh the caramel shine. Keep an extra small jar of the reserved pan juices to brush on just before serving for that restaurant-quality gloss.
Making this classic upside-down apple tart is an act of patience and delight. It rewards careful attention with dramatic presentation and comforting flavors. Invite friends, slice warm, and enjoy the small moments that make a shared dessert so memorable.
Pro Tips
Use firm, tart apples like Granny Smith to maintain texture and to balance the caramel’s sweetness.
Watch the caramel closely; it can go from golden to burnt in a matter of seconds.
Chill the puff pastry until just before topping to keep layers flaky and prevent sinking.
If excess liquid accumulates, spoon it out and reserve; it will thicken into a glossy glaze as it cools.
Warm slices gently in a 300°F oven to revive crispness before serving.
This nourishing classic apple tarte tatin recipe is sure to be a staple in your kitchen. Enjoy every moist, high protein slice — it is perfect for breakfast or as a wholesome snack any time.
Tags
Classic Apple Tarte Tatin
This Classic Apple Tarte Tatin recipe makes perfectly juicy, tender, and flavorful steak every time! Serve with potatoes and a side salad for an unforgettable dinner in under 30 minutes.
Ingredients
Main
Instructions
Prepare the apples
Peel, core, and halve the apples. Toss with 1 tablespoon fresh lemon juice to prevent browning and to brighten flavor. Work quickly and keep apples uniform in size for even cooking.
Make the caramel
In a heavy 9-inch ovenproof skillet over medium heat, add 3/4 cup sugar, 4 tablespoons butter, and 1 tablespoon lemon juice. Cook gently, stirring until sugar dissolves, then allow to bubble until a light golden amber forms. Remove from heat and stir in 1/4 teaspoon salt.
Arrange apples and bake
Pack apple halves cut-side up into the caramel snugly, creating an even layer. Bake in a 350°F oven for about 20 minutes until apples are partially tender. Let cool to room temperature before adding pastry.
Top with pastry and finish baking
Roll chilled puff pastry to an 11 to 12 inch circle and prick with a fork. Drape over apples, tucking edges down inside the skillet. Bake at 375°F for 25 to 30 minutes until pastry is golden and crisp.
Rest and invert
Let the tart rest for 15 minutes. Spoon out any excess liquid and reserve. Place a serving plate over the skillet and invert while warm to release the tart. Brush reserved pan juices if needed for extra gloss.
Serve warm
Slice and serve warm with whipped cream or vanilla ice cream. Rewarm slices at 300°F for about 10 minutes if prepared ahead and chilled.
Last Step: Please leave a rating and comment letting us know how you liked this recipe! This helps our business to thrive and continue providing free, high-quality recipes for you.
Nutrition
Did You Make This?
Leave a comment & rating below or tag
@epicula on social media!
Categories:
You might also like...

Mississippi Mud Brownies
Ultra-fudgy brownies crowned with toasted mini marshmallows and warm cocoa icing, with molten chocolate pockets in every bite.

Buttery Pecan Pie Bars
Buttery shortbread crust topped with a gooey brown sugar pecan filling. Just 10 minutes to prep for bakery-worthy bars with irresistible crunch.

Crack-Free Pumpkin Cheesecake
Ultra-creamy pumpkin cheesecake with a graham crust, bakes without cracks, and shines with caramel and rum-kissed whipped cream.
Did You Make This?
Leave a comment & rating below or tag @epicula on social media!
Rate This Recipe
Share This Recipe
Enjoyed this recipe? Share it with friends and family, and don't forget to leave a review!
Comments (1)
This recipe looks amazing! Can't wait to try it.
Comments are stored locally in your browser. Server comments are displayed alongside your local comments.

Hi, I'm Olivia!
What's Popular

30-Minute Meals!
Join to receive our email series which contains a round-up of some of our quick and easy family favorite recipes.