
Classic Mini Quiche (Flaky Crust, Make-Ahead)

Buttery mini quiches with a flaky crust and a creamy egg filling—perfect for brunch, parties, or make-ahead breakfasts.

This recipe for mini quiche has been a kitchen staple in my home for years—simple, forgiving, and endlessly adaptable. I first developed this version on a sleepy Sunday morning when I wanted something elegant for a small family brunch but didn’t want to be tied to the stove. The result was a tray of golden, bite-sized quiches with a tender, flaky crust and a rich, custardy center. They disappeared so fast that I started making two batches every time.
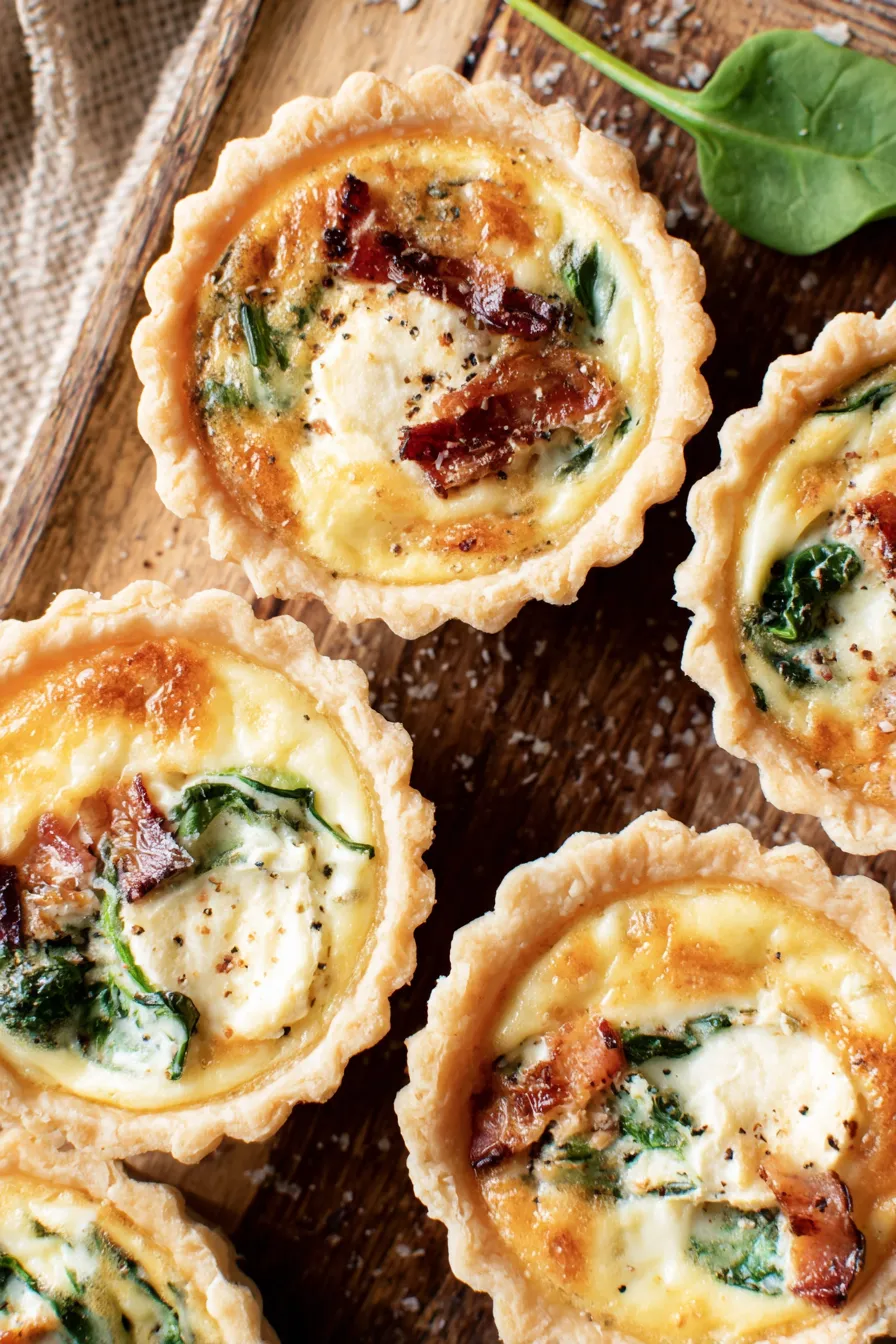
What makes these mini quiches special is the balance between a crisp all-butter crust and a delicate filling that holds flavorful add-ins without becoming soggy. I usually prepare the pie dough the night before so it has time to chill and relax; that little bit of planning produces a crust that behaves beautifully when cut into small rounds. Whether stuffed with sautéed spinach and feta, smoked ham and cheddar, or mushrooms with thyme and Gruyère, these little tarts carry big flavor and are endlessly portable.
Why You'll Love This Recipe
- Fast to assemble: once the dough is chilled you can fill and bake 48 mini quiches in under an hour total—ready in about 55 minutes including baking (makes two 24-count pans).
- Make-ahead friendly: dough can be prepared the day before and the baked quiches store refrigerated for up to 4 days or freeze well for longer.
- Pantry-flexible: the custard base uses common refrigerated staples—eggs, whole milk, and heavy cream—while add-ins can be anything from jarred roasted peppers to leftover cooked bacon.
- Crowd-pleasing: bite-size portions are ideal for parties, potlucks, and brunches—guests can sample a variety of flavors without committing to a large slice.
- Consistent texture: the 50/50 mix of milk and cream gives a silky, stable set that resists weeping and stays tender even after refrigeration.
- Beginner-friendly technique: rolling, cutting, and pressing dough into mini tins is forgiving—warm hands, quick work, and a floured surface make it easy to shape.
In my house, my father always reached first for the mushroom-thyme version while my kids preferred the bacon-cheddar. I learned to double the batch when friends come over; the quiches travel well and are the first thing gone on any brunch spread.
Ingredients
- Pie crust: 2 unbaked flaky pie crusts (store-bought flakey crust or an all-butter pie crust). Look for an all-butter crust if you prefer a richer flavor—brands like Immaculate Baking or your favorite local bakery work well. Chill the dough at least 2 hours before rolling.
- Eggs: 4 large eggs. Room temperature eggs incorporate better into the custard and yield a smoother texture—set them out 20 minutes before mixing or warm briefly in a bowl of warm water.
- Whole milk: 1/2 cup. Provides body and keeps the custard from setting too firmly; for a lighter set, substitute more milk and less cream but expect a less silky mouthfeel.
- Heavy cream: 1/2 cup heavy cream or heavy whipping cream. The fat in cream gives that luxurious custard and helps the filling stay moist after cooling.
- Salt & pepper: 1/4 teaspoon each. Season the custard but remember add-ins like bacon or feta bring additional salt—taste and adjust accordingly.
- Add-ins (total 3/4 cup): Choose cooked and well-drained toppings (examples: 1/2 cup cooked crumbled bacon + 1/4 cup chopped green onion; or 3/4 cup sautéed spinach, squeezed dry). Raw watery vegetables will make the filling soggy—precook mushrooms, onions, and greens.
- Cheese: 1/2 cup shredded or crumbled cheese (cheddar, Gruyère, feta, or goat cheese). Shred from a block for the best melt and texture—pre-shredded cheeses often include anti-caking agents that affect melting.
- Pan prep: Nonstick spray for two 24-count mini muffin pans or two runs through a 24-well tartlette tin. Proper greasing ensures easy release and clean bottoms.
Instructions
Prepare the dough: Make pie dough the night before if possible and chill at least 2 hours. Cold dough rolls more cleanly and resists shrinking in the oven. Take one crust from the fridge just before rolling; keep the second in the refrigerator until ready to use so it stays firm. Make the custard: In a large bowl whisk together 4 large eggs, 1/2 cup whole milk, 1/2 cup heavy cream, 1/4 teaspoon salt, and 1/4 teaspoon freshly ground black pepper until homogeneous and slightly frothy—about 45–60 seconds with a whisk or 30 seconds on medium speed with a mixer. Cover and refrigerate until step 6 so the custard stays cold. Preheat and prep pans: Preheat oven to 375°F (191°C). Grease two 24-count mini muffin pans thoroughly with nonstick spray. If you own a single mini pan, plan to bake in batches; the dough for the second batch should remain chilled until the first batch is finished baking. Roll and cut rounds: On a lightly floured surface roll one chilled pie crust into a 12-inch circle. Use a 2.5-inch round cutter (or a 1/3-cup measuring cup rim) to cut rounds; re-roll scraps as needed, working quickly to prevent warming. Aim for about 24 rounds per crust—48 total. If the edges crack, press gently with warm fingers to seal. Form shells in the pan: Place each dough round into a greased muffin well and press to line the bottom and sides so you have a shallow cup. The dough should be even in thickness; thinner bottoms bake quicker and can brown too fast—try to keep thickness consistent. Fill and top: Evenly ladle the chilled egg mixture into each crust (leave a little headspace; the custard will puff slightly). Sprinkle add-ins (about 3/4 cup divided across the tray) and finish with 1/2 cup total shredded or crumbled cheese, dividing evenly. Be careful not to overfill—aim for about 3/4 full. Bake: Bake at 375°F (191°C) until the centers are just set and edges are lightly golden, about 25–28 minutes. Rotate pans halfway through baking if your oven has hot spots. The quiches should jiggle only slightly in the center when you tap the pan. Cool and remove: Allow the mini quiches to cool 5 minutes in the pan, then use a small spoon to lift them gently out—if the pans are well-greased they should release easily. Serve warm or at room temperature; refrigerate leftovers within two hours.
You Must Know
- Storage: store cooled quiches in an airtight container in the fridge for up to 4 days; they also freeze well for up to 2 months—thaw overnight in the refrigerator before reheating.
- Nutritional note: a single mini quiche is a concentrated source of protein and fat—serve with fresh fruit or a light salad to balance the meal.
- Texture tip: precook and drain all high-moisture add-ins (spinach, mushrooms, leeks) to avoid soggy bottoms.
- Make-ahead: assemble unbaked shells and cover; either bake from chilled (add 2–3 minutes to baking time) or freeze for later—bake straight from frozen adding 6–8 minutes.
My favorite thing about these is how forgiving they are; a slightly over-rolled edge or a less-than-perfect round still bakes into a charming tart. Guests assume I spent hours making them, so they're a great entertaining secret weapon.
Storage Tips
To keep quality at its peak, cool the quiches completely before storing. Refrigerate in a single layer in an airtight container for up to 4 days—place parchment between layers if stacking. For longer storage, freeze baked quiches in a single layer on a sheet tray until firm, then transfer to a zip-top bag for up to 2 months. Reheat from frozen at 350°F (177°C) for 10–12 minutes or until warmed through; thawed quiches reheat in a 325°F (163°C) oven for 8–10 minutes. For microwave reheating, use short 20–30 second bursts to avoid rubbery texture.
Ingredient Substitutions
If you need dairy-free options, use a vegan pie crust and substitute a blend of unsweetened soy creamer plus a tablespoon of cornstarch per 1/2 cup cream to help thicken—note texture will differ. For a lighter custard, swap half-and-half for heavy cream, but the set will be slightly firmer. For gluten-free, use a store-bought gluten-free pie crust rolled carefully; blind-baking for 5–7 minutes can help prevent a wet bottom. Protein swaps: diced cooked chicken or chopped cooked sausage work well instead of bacon.
Serving Suggestions
Serve warm or at room temperature alongside a bright green salad dressed with lemon vinaigrette, a platter of fresh fruit, or pickled vegetables. For a brunch board, arrange assorted mini quiches with smoked salmon, sliced radishes, and herb garnishes—sprinkle chopped chives or microgreens over the top for color. They’re also excellent for holiday buffets, where a variety of flavors allows guests to sample multiple combinations.
Cultural Background
These small tarts are an adaptation of the classic French savory tart—quiche—popularized internationally by quiche Lorraine (bacon and custard). Miniaturizing the tart makes it party-friendly and portable, a trend that grew with canapé culture. The technique borrows from French pastry traditions, emphasizing cold butter in the crust for flakiness and a rich egg-cream custard reminiscent of classic bakes found in European cafés.
Seasonal Adaptations
Adapt fillings to the season: spring calls for ramps and asparagus tips with goat cheese; summer favors roasted tomatoes and basil with fresh mozzarella; autumn is perfect for caramelized onions and Gruyère with thyme; winter invites roasted root vegetables and sage with sharp cheddar. Swap herbs and cheese to complement the seasonal produce and keep pantry staples on hand for last-minute batches.
Meal Prep Tips
For efficient meal prep, make crust and custard ahead: keep dough chilled and custard refrigerated up to 24 hours. Pre-cook and portion add-ins into small containers. On the day you plan to serve, assemble and bake just before guests arrive or bake earlier and reheat. Pack mini quiches individually in meal boxes with a side salad for portable lunches that reheat well in an oven or toaster oven.
These mini quiches are a reliable, comforting choice that brings friends and family together around simple, honest flavors. Try a duo of varieties at your next gathering and watch them fly off the platter.
Pro Tips
Keep the dough cold: work quickly and return scraps to the fridge between rolls to prevent shrinkage and tough crusts.
Precook and squeeze out moisture from vegetables like spinach and mushrooms to avoid watery fillings.
Use block cheese and shred it yourself for better melting and texture—pre-shredded cheese contains anti-caking agents.
Grease mini pans well or use silicone inserts for easy release; allow quiches to cool 5 minutes before removing.
This nourishing classic mini quiche (flaky crust, make-ahead) recipe is sure to be a staple in your kitchen. Enjoy every moist, high protein slice — it is perfect for breakfast or as a wholesome snack any time.
FAQs about Recipes
Can I freeze mini quiches?
Yes—baked mini quiches can be frozen for up to 2 months. Freeze on a sheet tray until firm, then transfer to a freezer bag and reheat from frozen at 350°F (177°C) for 10–12 minutes.
What can I substitute for heavy cream?
Use a mixture of milk and cream for a silky texture. If you only have half-and-half, expect a slightly firmer set; adjust by reducing milk.
How do I prevent soggy bottoms?
Precook and drain any watery add-ins like spinach or mushrooms to avoid soggy bottoms. Also, keep the custard cold when filling to ensure even baking.
Tags
Classic Mini Quiche (Flaky Crust, Make-Ahead)
This Classic Mini Quiche (Flaky Crust, Make-Ahead) recipe makes perfectly juicy, tender, and flavorful steak every time! Serve with potatoes and a side salad for an unforgettable dinner in under 30 minutes.
Ingredients
Crust
Custard
Add-ins & Cheese
Pan Prep
Instructions
Prepare the dough
Make pie dough the night before and chill at least 2 hours. Keeping dough cold produces a flakier crust and makes it easier to cut into rounds.
Make the custard
Whisk together 4 large eggs, 1/2 cup whole milk, 1/2 cup heavy cream, 1/4 teaspoon salt, and 1/4 teaspoon pepper until combined; cover and refrigerate until ready to fill.
Preheat and prep pans
Preheat oven to 375°F (191°C) and thoroughly grease two 24-count mini muffin pans with nonstick spray.
Roll and cut rounds
Roll one chilled crust to a 12-inch circle and cut 2.5-inch rounds using a cookie cutter or 1/3-cup measure. Re-roll scraps as necessary and work quickly to avoid warming the dough.
Form shells
Press each round into a greased muffin well, lining the bottom and sides evenly to create a shallow cup.
Fill, top, and bake
Evenly pour the cold custard into each shell, top with 3/4 cup total add-ins and 1/2 cup cheese. Bake 25–28 minutes until centers are just set and edges are lightly golden.
Cool and remove
Cool quiches 5 minutes in the pan, then remove gently with a spoon. Serve warm or at room temperature and refrigerate leftovers within two hours.
Last Step: Please leave a rating and comment letting us know how you liked this recipe! This helps our business to thrive and continue providing free, high-quality recipes for you.
Nutrition
Did You Make This?
Leave a comment & rating below or tag
@epicula on social media!
Categories:
You might also like...

Mississippi Mud Brownies
Ultra-fudgy brownies crowned with toasted mini marshmallows and warm cocoa icing, with molten chocolate pockets in every bite.

Buttery Pecan Pie Bars
Buttery shortbread crust topped with a gooey brown sugar pecan filling. Just 10 minutes to prep for bakery-worthy bars with irresistible crunch.

Crack-Free Pumpkin Cheesecake
Ultra-creamy pumpkin cheesecake with a graham crust, bakes without cracks, and shines with caramel and rum-kissed whipped cream.
Did You Make This?
Leave a comment & rating below or tag @epicula on social media!
Rate This Recipe
Share This Recipe
Enjoyed this recipe? Share it with friends and family, and don't forget to leave a review!
Comments (1)
This recipe looks amazing! Can't wait to try it.
Comments are stored locally in your browser. Server comments are displayed alongside your local comments.

Hi, I'm Olivia!
What's Popular

30-Minute Meals!
Join to receive our email series which contains a round-up of some of our quick and easy family favorite recipes.