
>>

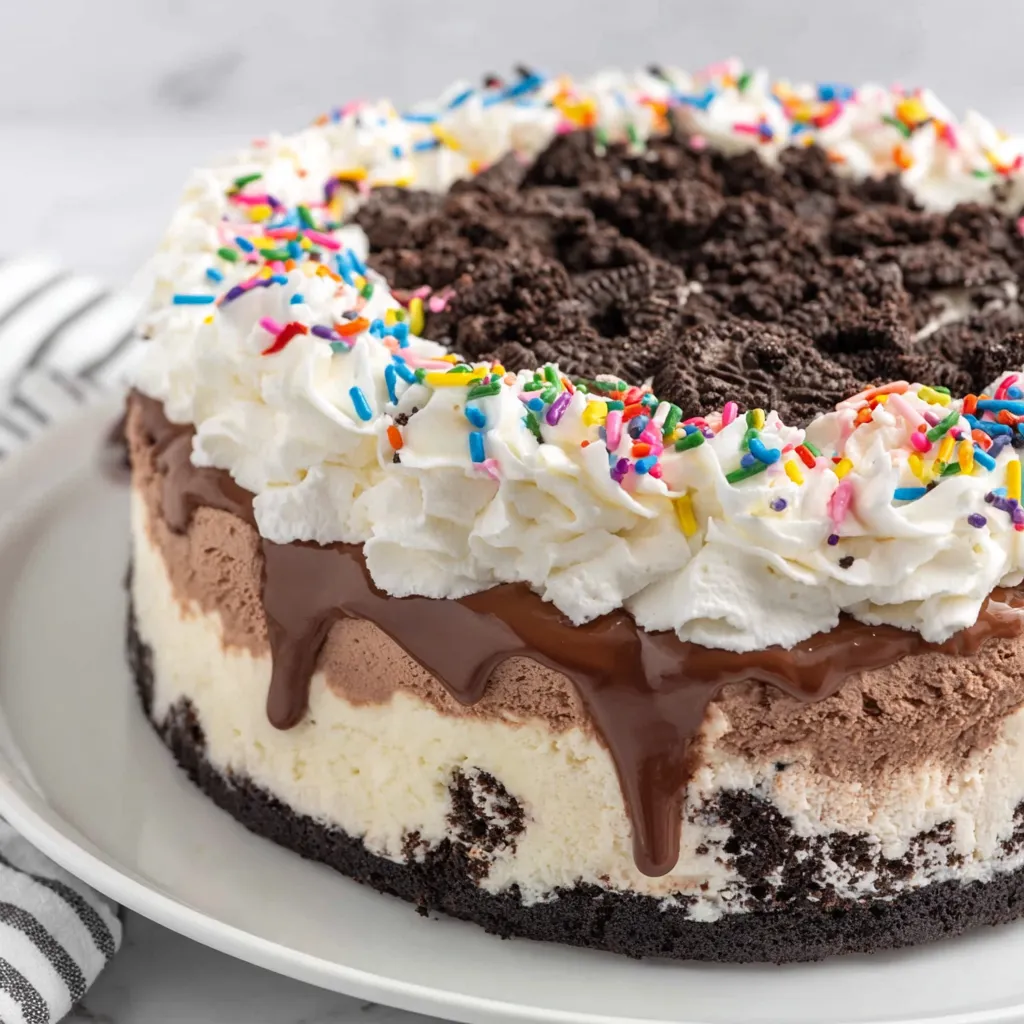
A nostalgic, crowd-pleasing frozen treat: layers of cookie crumb, chocolate and vanilla ice cream, hot fudge, and whipped cream — just like Dairy Queen.
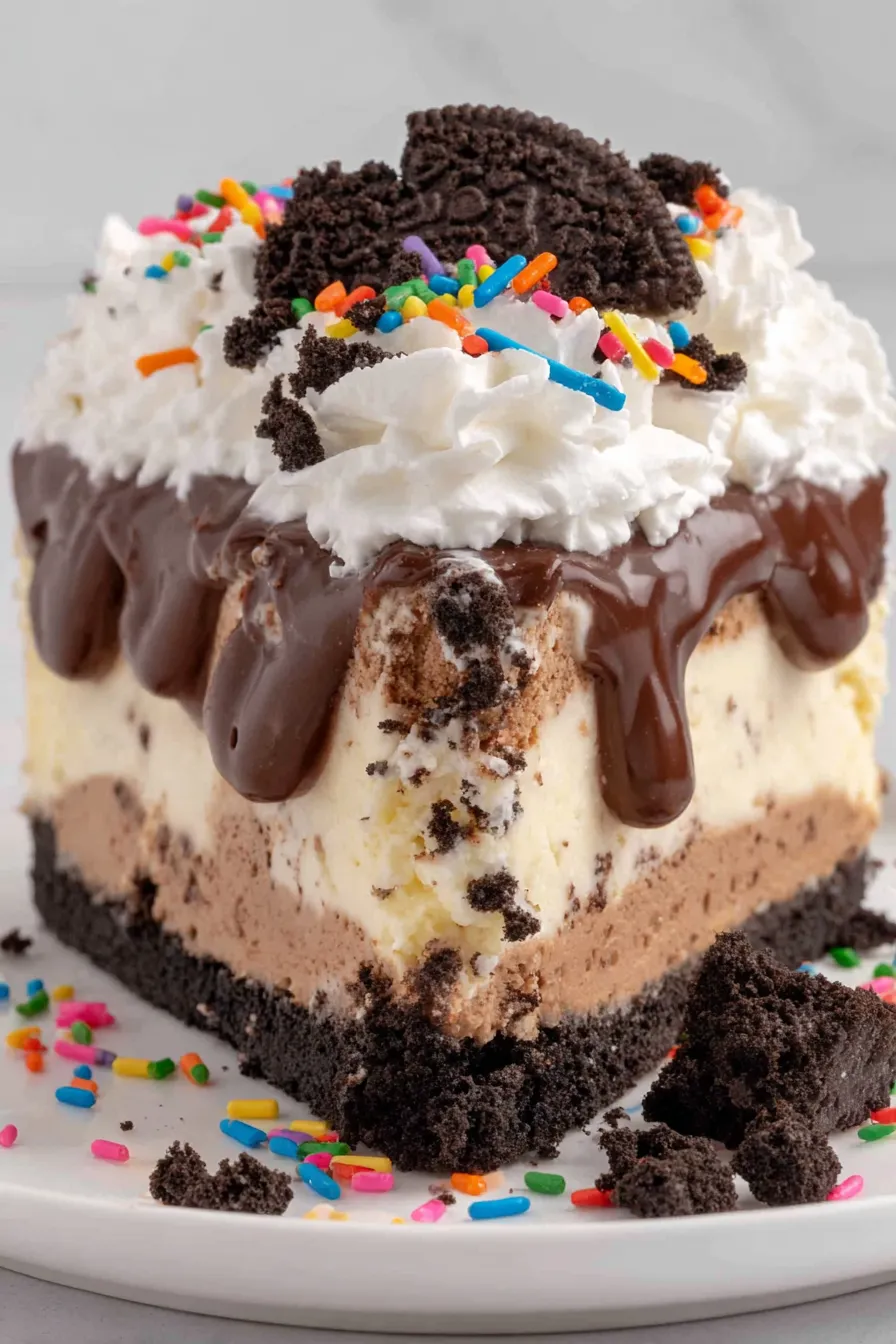
This copycat Dairy Queen ice cream cake is one of those recipes that instantly transports me back to summer evenings, birthday parties, and the familiar hum of the freezer section while the whole family debated toppings. I first recreated this combination during a rainy June when store-bought cakes were scarce and I wanted the exact contrast of crunchy cookie, ribboned hot fudge, and pillowy whipped frosting. The texture is key: a crisp cookie base, a dense chocolate ice cream layer with a shiny hot fudge ribbon, and a softer vanilla bean top that yields on the first forkful.
I discovered small technique tricks that make a big difference — baking the cookie crumbs briefly to set the base, thawing ice cream just enough to spread smoothly, and chilling my mixing bowl so the whipped topping peaks perfectly. Making this cake became a ritual: the kids pick who gets the corner slice, and neighbors inevitably ask for a recipe. The finished cake is not only delicious but nostalgic; if you grew up with chain parlor desserts, this version nails the balance of creaminess, fudge, and playful sprinkles.
When I served this at my nephew’s seventh birthday, it disappeared within 15 minutes. People commented on the clean layers and how the hot fudge ribbon held exactly the right amount of chew and shine. I also learned that using vanilla bean ice cream gives tiny speculated flecks that elevate the visual appeal, so I often swap plain vanilla for vanilla bean when I want the cake to look extra-special.
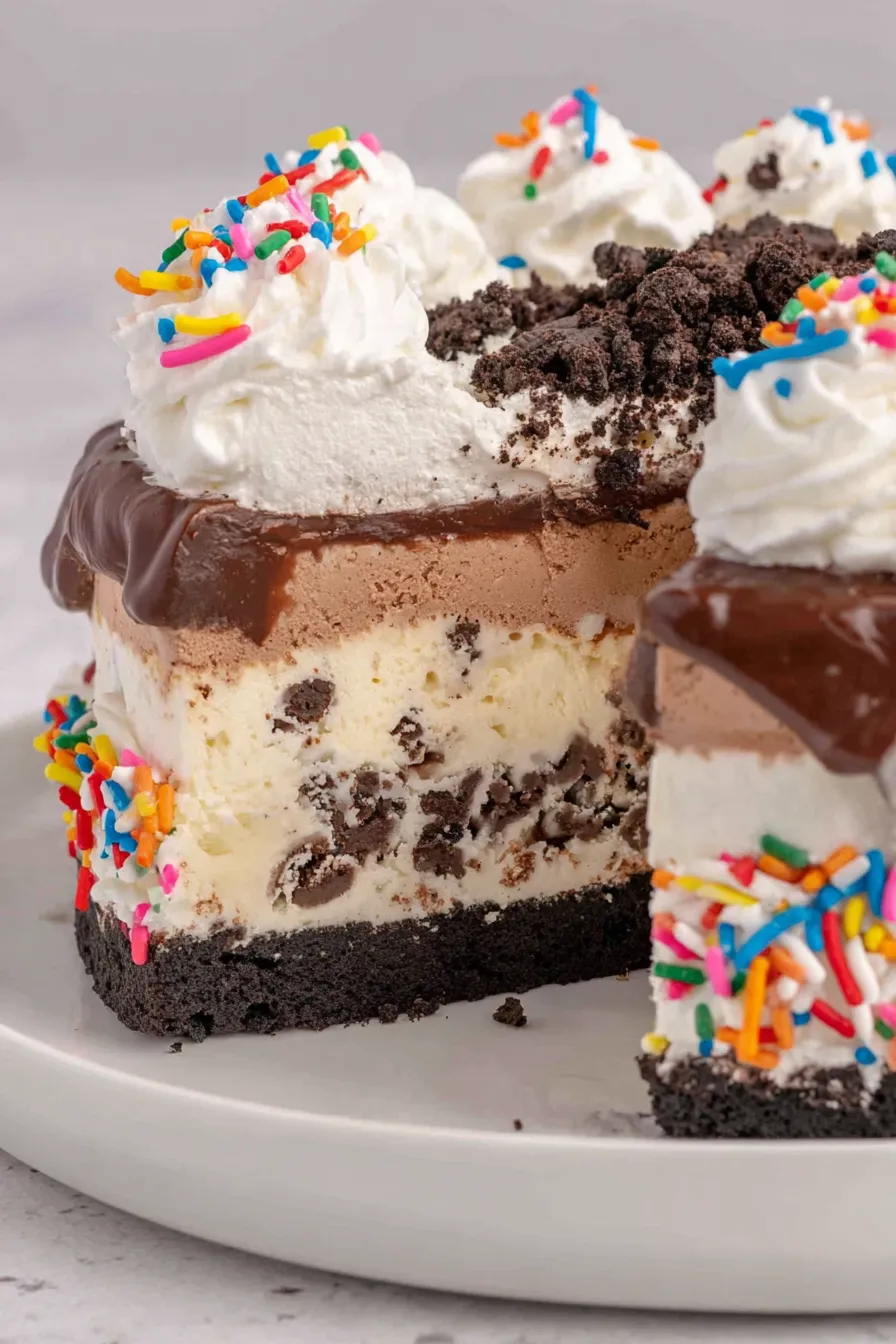
My favorite thing about this cake is how reliably it evokes celebration. The hot fudge ribbon is the marker of a well-made version — when the fudge stays glossy and does not sink, you know the chocolate layer and timing were right. I also love watching guests’ faces when they see the clean cross-section of cookie, fudge, and two distinct ice cream layers; it always brings a nostalgic hush before the first bite.
Store leftover slices in an airtight container lined with parchment to prevent frost buildup. If you plan to freeze leftovers longer than a week, wrap individual slices in plastic wrap and place them in a labeled freezer bag; they will maintain quality for up to 3 months. To thaw, place slices on the counter for 10 to 15 minutes or in the refrigerator for 30 to 45 minutes. For the cleanest slices, remove the whole cake 10 minutes before cutting and wipe the knife with warm water between cuts.
Short on time? Use pre-made chocolate cookie crumbs and skip the brief bake if you trust the crumbs to bind. For dairy-free adaptations, substitute coconut-based ice creams and a stabilized coconut cream frosting, though texture and flavor will differ from the original. If you prefer no added refined sugar, seek ice creams labeled low-sugar and use a sugar-free hot fudge, but expect a slightly different mouthfeel. Vanilla extract may replace clear vanilla flavoring; the frosting will be slightly less bright but more aromatic.
Serve slices with a hot espresso for contrast or a simple bowl of fresh berries to cut richness. For a party, present the cake on a chilled cake board and add extra piped rosettes at equal intervals to make portioning easier. Pair the cake with a light, citrusy salad after the main course to balance the meal, or serve small amuse-bouche sized slices for sampling at a dessert bar.
The layered ice cream cake is an American celebration staple, popularized by ice cream parlors and fast-service chains in the latter half of the 20th century. This format — cookie base, layered ice creams, fudge ribbons, and whipped decoration — became synonymous with birthday parties and casual celebrations. Regional variations exist, with some areas favoring brownie instead of cookie bases, or caramel in place of fudge, but the core idea of layered textures remains constant.
For summer, fold fresh chopped strawberries into the vanilla layer for a subtly fruity note. In winter, swap the chocolate ice cream for peppermint chocolate and add crushed candy cane sprinkles. Holiday cakes may use themed sprinkles and colored frosting; for a fall twist, swirl a thin layer of pumpkin butter into the vanilla ice cream, but freeze quickly to prevent separation.
Make the cookie crumbs and melt the butter up to a week ahead and store in an airtight container. Plan your freezer time: assemble layers in blocks so you can fit the pan flat in a single freezer opening. If transporting, freeze the cake fully then place in a cooler with ice packs to maintain temperature — remove outer packaging only once at the venue to avoid condensation.
Readers often tell me this cake is their go-to for birthdays when they want a homemade feel with a nostalgic twist. A friend replaced the vanilla with coffee ice cream for a grown-up birthday and reported rave reviews. Another reader used gluten-free sandwich cookies with success for gluten-intolerant guests, noting the texture was slightly different but still delightful. These adaptations show how versatile the template is while keeping the joyful core intact.
Make this cake your own by choosing ice creams and toppings that carry your favorite flavors. The assembly is forgiving, the result is celebratory, and the reactions are always worth the few hours of freezing. Enjoy — and save yourself a corner slice.
Chill metal bowls and beaters for 30 minutes before whipping cream to get stable peaks faster.
Use a warm offset spatula to smooth ice cream layers; dip it in hot water and dry it between passes.
Reserve a cup of whipped topping before frosting to pipe decorations quickly when the cake comes out of the freezer.
Bake the crumbs briefly to intensify flavor and help the base hold together when slicing.
This nourishing copycat dairy queen ice cream cake recipe is sure to be a staple in your kitchen. Enjoy every moist, high protein slice — it is perfect for breakfast or as a wholesome snack any time.
Yes. The assembled cake keeps well frozen up to 3 months when wrapped tightly. Thaw in the refrigerator for 30 to 45 minutes before serving.
If you let the ice cream soften too much, return it to the freezer until firm before proceeding to the next layer to avoid soggy textures.
This Copycat Dairy Queen Ice Cream Cake recipe makes perfectly juicy, tender, and flavorful steak every time! Serve with potatoes and a side salad for an unforgettable dinner in under 30 minutes.
Line a 9-inch springform pan with plastic wrap, allowing the wrap to overhang for easy removal later. Set aside on a tray for transferring to the freezer.
Preheat oven to 350 degrees F. Combine 20 crushed chocolate sandwich cookies with 4 tablespoons melted butter, spread on a parchment-lined 10x15-inch sheet, and bake 7 to 8 minutes. Cool completely.
Remove 1 quart chocolate ice cream from the freezer for 15 to 20 minutes until slightly softened but not melting. This makes spreading easier and prevents separation.
Press softened chocolate ice cream into the bottom of the lined pan in an even layer. Smooth with a spatula and freeze for 30 minutes to 1 hour to firm.
Microwave the hot fudge for 20 to 25 seconds to loosen. Spread evenly over the chilled chocolate layer with an offset spatula.
Evenly sprinkle the cooled baked cookie crumbs over the hot fudge layer and return the pan to the freezer for 1 hour so layers set.
Allow 1 quart vanilla ice cream to soften 15 to 20 minutes. Spread it over the cookie crumb layer, smooth the top, and freeze 4 to 6 hours or overnight.
Chill your mixing bowl and beaters for 30 minutes. Whip 2 cups cold heavy cream with 1 1/4 cups powdered sugar and 1 1/2 teaspoons clear vanilla flavoring until stiff peaks form. Reserve 1 cup for piping.
Remove the cake from the freezer, release the springform, and lift the cake on the plastic wrap to a serving plate. Quickly frost sides and top with whipped cream to prevent melting.
Fill a piping bag fitted with a large star tip with reserved whipped cream. Pipe a shell or swirl border along the top edge, add colorful sprinkles, and return to the freezer until ready to serve.
Last Step: Please leave a rating and comment letting us know how you liked this recipe! This helps our business to thrive and continue providing free, high-quality recipes for you.
Leave a comment & rating below or tag
@epicula on social media!

Ultra-fudgy brownies crowned with toasted mini marshmallows and warm cocoa icing, with molten chocolate pockets in every bite.

Buttery shortbread crust topped with a gooey brown sugar pecan filling. Just 10 minutes to prep for bakery-worthy bars with irresistible crunch.

Ultra-creamy pumpkin cheesecake with a graham crust, bakes without cracks, and shines with caramel and rum-kissed whipped cream.
Leave a comment & rating below or tag @epicula on social media!
Enjoyed this recipe? Share it with friends and family, and don't forget to leave a review!
This recipe looks amazing! Can't wait to try it.
Comments are stored locally in your browser. Server comments are displayed alongside your local comments.

Join to receive our email series which contains a round-up of some of our quick and easy family favorite recipes.
