
>>

A one-pan weeknight favorite: crisped frozen pierogies roasted with kielbasa and colorful vegetables, finished with garlic butter and served with tangy sour cream.
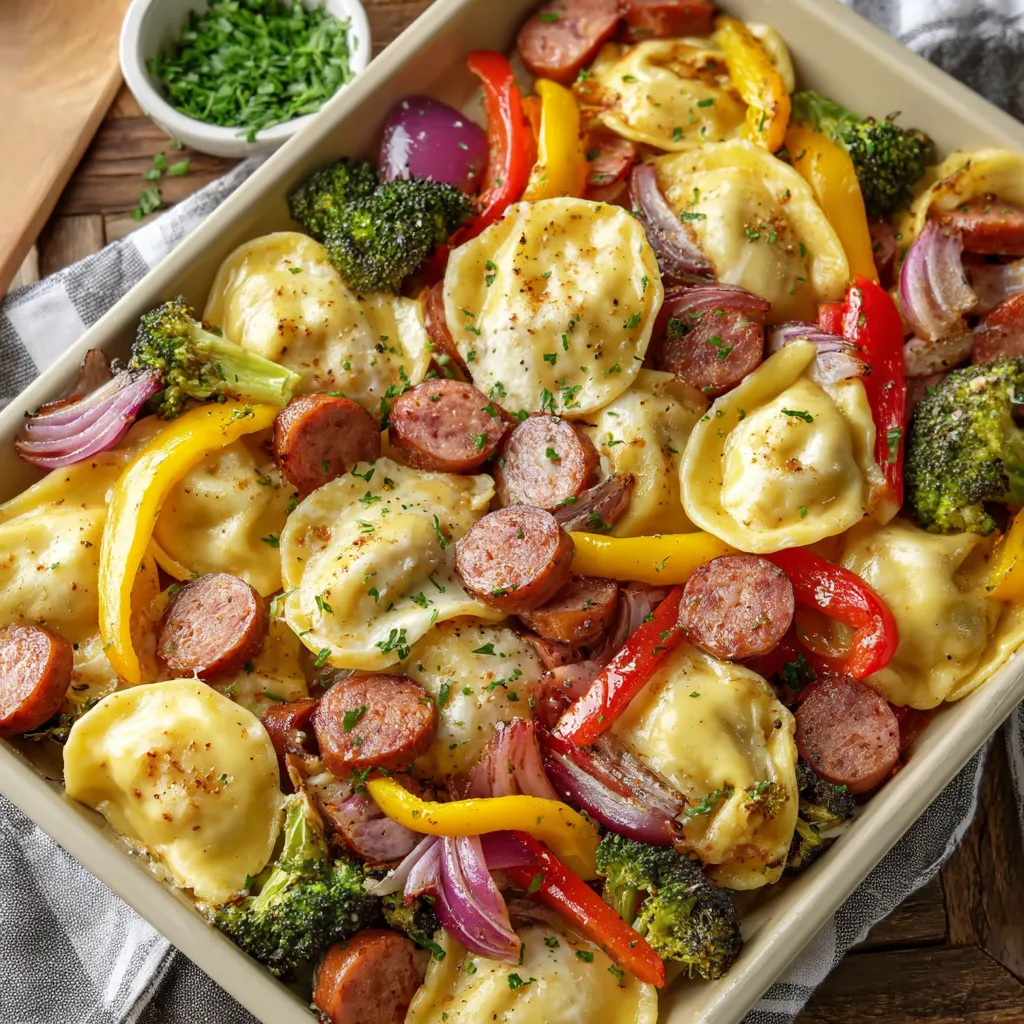
This sheet pan pierogies and kielbasa dish has been my go-to for busy weeknights ever since a friend brought a version to a potluck years ago. I loved how simple it was to toss frozen pierogies, sliced kielbasa and whatever vegetables were on hand onto a rimmed pan and let the oven do the work. The result is a meal that hits comforting textures—pillowy centers and golden, crisp edges on the pierogies—with the smoky, savory pop of kielbasa and sweet-roasted peppers. It feels indulgent without fuss, and it always draws a crowd.
I discovered this combination during a hectic week when I wanted something fast, satisfying and low-cleanup. The first time I made it I doubled the recipe and still had guests hovering over the sheet pan before I could plate. What makes this preparation special is the contrast of textures and the flexibility: use store-bought frozen pierogies and kielbasa for speed, or swap in handmade varieties for a more artisanal finish. A spoonful of sour cream brightens every bite and a drizzle of melted garlic butter at the end makes it feel homemade and celebratory.
In my household this is a no-fuss winner: kids love the crispy pierogies, adults appreciate the smoky kielbasa, and the peppers add color and a slightly sweet counterpoint. I frequently make a double batch for casual gatherings; everyone helps themselves and the leftovers reheat well under the broiler for a few minutes to recapture crunch.
My favorite part is how the simple finishing touches—garlic butter and fresh parsley—transform basic ingredients into something that feels special. I remember serving this at a casual backyard lunch; people kept asking for the recipe, and the pan returned nearly empty. The method taught me that texture and seasoning are everything: the same ingredients become ordinary when greasy or steamed, but with a hot oven and attention to spacing they sing.

Store leftovers in an airtight container in the refrigerator for up to 3 days. To retain the crisp texture, reheat in a preheated oven or toaster oven at 400°F for 6 to 10 minutes rather than microwaving. For longer storage, freeze cooled portions in freezer-safe containers or bags for up to 3 months; label with date and reheat from frozen at 400°F for about 12 to 18 minutes, checking halfway. Avoid storing with wet sauces that can make the pierogies soggy; keep sour cream separate until serving.
Swap kielbasa for smoked sausage, andouille or vegetarian sausage for a meat-free variant. If you need gluten-free, use certified gluten-free pierogies or small boiled potato dumplings. For lower fat, use turkey kielbasa and reduce butter, or skip the butter finish and finish with a squeeze of lemon. If broccoli isn’t on hand, try cauliflower florets, Brussels sprouts halves or sliced zucchini—adjust roasting times slightly for denser vegetables.
Serve straight from the pan for a rustic presentation or transfer to a large platter and sprinkle with fresh herbs. Accompany with small bowls of sour cream, whole-grain mustard or apple butter for contrasting flavors. Pair with a simple green salad, roasted beets, or steamed green beans for a balanced meal. For brunch, top with a fried egg; for a heartier dinner, add a side of braised cabbage or pickled vegetables to cut through the richness.
Pierogies are a beloved Eastern European dumpling with roots in Polish and Ukrainian cuisines; they were originally a peasant food that became a comfort classic. Paired with kielbasa—a smoked Polish sausage—the combination is a natural nod to Central and Eastern European flavor traditions. Sheet pan roasting is a modern, Americanized technique that adapts traditional boiled or pan-fried preparations into an easy, communal format ideal for weeknight cooking and family gatherings.
In summer, swap broccoli for grilled summer squash and add cherry tomatoes in the last 8 minutes of roasting. In fall, use roasted root vegetables like carrots and parsnips and finish with a sprinkle of sage. For holidays, fold in caramelized onions and whole-grain mustard, or add a splash of apple cider vinegar to brighten the pan just before serving. These small shifts keep the core method but tailor flavors to the season.
For streamlined meal prep, chop the vegetables and slice the kielbasa the night before and store in separate airtight containers. Toss everything with oil and seasoning in a sealed container and refrigerate; when ready to cook, spread on the sheet pan and roast. Portion cooked leftovers into single-serve containers with sauce on the side for ready-to-warm lunches. Use high-quality parchment for easy transfer and minimal cleanup when preparing multiple batches.
Bring this sheet pan combination to your next casual dinner or weekday meal rotation and enjoy how a few thoughtful steps transform convenient ingredients into a satisfying, shareable plate. Make it your own with seasonal vegetables, different sausages or a vegan twist, and you’ll have a versatile template that’s both reliable and delicious.
Keep pierogies frozen until you toss them with oil and seasoning to prevent them from becoming waterlogged.
Give the sheet pan plenty of space—crowding leads to steaming instead of browning.
Flip the pierogies and stir the vegetables halfway through roasting for even color and texture.
For extra crispness, broil for 1 to 2 minutes at the end, watching closely to avoid burning.
This nourishing easy sheet pan pierogies and kielbasa recipe is sure to be a staple in your kitchen. Enjoy every moist, high protein slice — it is perfect for breakfast or as a wholesome snack any time.
Yes. Frozen pierogies should stay frozen until assembly; roasting at high heat will thaw and crisp them without making them soggy.
Store in the refrigerator for up to 3 days and re-crisp in a 400°F oven for 6 to 10 minutes. Freeze for up to 3 months.
This Easy Sheet Pan Pierogies and Kielbasa recipe makes perfectly juicy, tender, and flavorful steak every time! Serve with potatoes and a side salad for an unforgettable dinner in under 30 minutes.
Preheat oven to 425°F. Line a large rimmed sheet pan with parchment or lightly grease to prevent sticking.
In a large mixing bowl combine frozen pierogies, sliced kielbasa, chopped bell peppers, sliced onion and broccoli florets. Keep pierogies frozen until tossed with oil.
Drizzle 3 tablespoons olive oil over the bowl and sprinkle garlic powder, paprika, onion powder, salt and pepper. Toss until evenly coated.
Spread the mixture in a single layer on the prepared pan without crowding so items can brown properly.
Bake 25 to 30 minutes, flipping the pierogies and stirring vegetables and kielbasa once halfway through for even browning.
Remove from oven and drizzle with melted garlic butter if desired. Sprinkle with chopped parsley or green onions for freshness.
Serve warm with sour cream for dipping. For best texture, serve immediately or re-crisp leftovers in a hot oven.
Last Step: Please leave a rating and comment letting us know how you liked this recipe! This helps our business to thrive and continue providing free, high-quality recipes for you.
Leave a comment & rating below or tag
@epicula on social media!

Ultra-fudgy brownies crowned with toasted mini marshmallows and warm cocoa icing, with molten chocolate pockets in every bite.

Buttery shortbread crust topped with a gooey brown sugar pecan filling. Just 10 minutes to prep for bakery-worthy bars with irresistible crunch.

Ultra-creamy pumpkin cheesecake with a graham crust, bakes without cracks, and shines with caramel and rum-kissed whipped cream.
Leave a comment & rating below or tag @epicula on social media!
Enjoyed this recipe? Share it with friends and family, and don't forget to leave a review!
This recipe looks amazing! Can't wait to try it.
Comments are stored locally in your browser. Server comments are displayed alongside your local comments.

Join to receive our email series which contains a round-up of some of our quick and easy family favorite recipes.
