
Funfetti Icebox Cake Delight

A no-bake, playful icebox treat layered with creamy vanilla filling, crunchy shortbread, and rainbow sprinkles — perfect for celebrations and easy entertaining.
This Funfetti Icebox Cake Delight has been my go-to for birthdays, last-minute celebrations, and whenever I want something nostalgic yet effortless. I first made this version on a rainy afternoon when I had a box of shortbread cookies and a craving for something sweet that didn’t require the oven. The combination of silky cream cheese, instant vanilla pudding, and whipped topping folded together with a tumble of rainbow sprinkles felt like childhood birthday cake in frozen form. It’s light, creamy, and delightfully crunchy where the shortbread stays just tender enough to give texture without turning mushy.
What makes this so special is how accessible the ingredients are and how forgiving the assembly is. You don’t need precise piping skills — just a springform pan and a spatula. The contrast of the tangy, smooth cream cheese filling against buttery shortbread and bursts of sugary sprinkles creates layers of flavor that keep every bite interesting. I love making it a day ahead: it chills into a parade of colors and textures, and guests always ask for the recipe after one forkful. This is the kind of dessert that arrives ready to smile at the table.
Why You'll Love This Recipe
- Ready with minimal hands-on time: about 20 minutes of active prep and a few hours to chill — perfect for busy hosts and make-ahead plans.
- Uses pantry staples and common grocery items: cream cheese, instant vanilla pudding, whipped topping, and shortbread cookies.
- Kid-friendly and crowd-pleasing: colorful sprinkles make it festive for birthdays, showers, and potlucks without extra effort.
- Flexible assembly: layer cookies to fit your pan, break to shape, and the filling is forgiving if it’s slightly thicker or thinner.
- No oven required: ideal for summer, small kitchens, or anyone avoiding extra heat, and it transports well when chilled.
- Make-ahead friendly: chill overnight or freeze for shorter-term storage, then allow a brief tempering before serving.
My family’s reaction the first time I made this was instant: my niece enthusiastically declared it "rainbow cake," and even my most skeptical dessert-lover went back for seconds. Over time I learned subtle tweaks — like reserving sprinkles for the top to prevent color bleeding, or softening the cream cheese at room temperature for smoother mixing — that improved texture and presentation every time.
Ingredients
- Cream Cheese (8 oz): Use full-fat cream cheese at room temperature for the smoothest texture and best flavor. Brands like Philadelphia yield a reliable, creamy base; make sure it’s softened for about 30 minutes before mixing.
- Whipped Topping (8 oz): Cool Whip or a whipped homemade creme fraiche-based topping both work. Store-bought is easy and stable; if using homemade whipped cream, stabilize it with a bit of powdered sugar to avoid weeping.
- Milk (2 cups): Whole milk gives the creamiest mouthfeel; 2% works fine if you prefer a lighter option. Pour slowly into the pudding mix for smoothness.
- Instant Vanilla Pudding Mix (6.8 oz): Two 3.4 oz boxes of instant vanilla pudding provide structure and that recognizable cake-like flavor. Avoid cook-and-serve pudding here — instant sets the filling without heat.
- Vanilla Extract (2 teaspoons): Pure vanilla extract adds depth; avoid imitation for a less complex flavor.
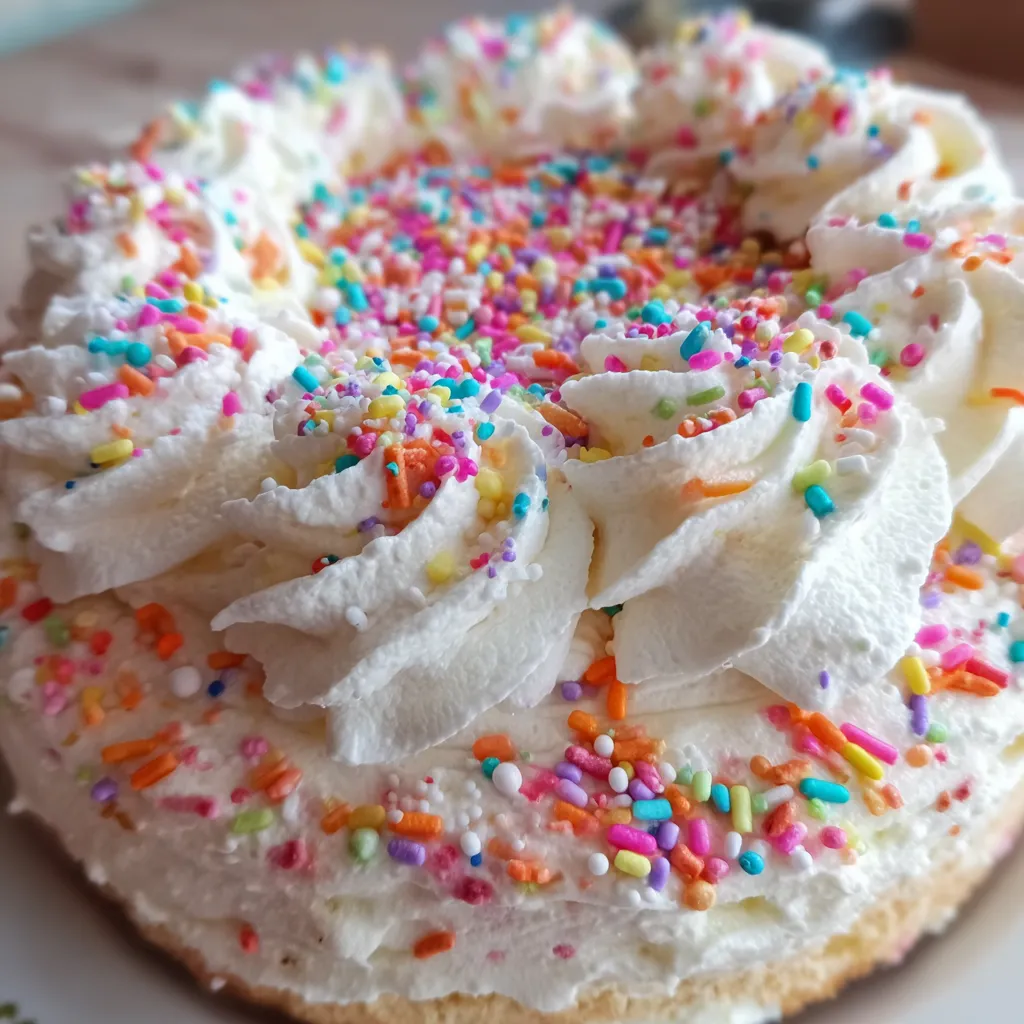
- Rainbow Sprinkles (11 oz): Use high-quality jimmies (not nonpareils) so colors hold. Reserve a small amount for garnish to keep the layers bright without color run.
- Shortbread Cookies (10 oz): A standard 10 oz box of shortbread or butter cookies forms the crunchy layers. Walker’s shortbread or similar buttery rounds work beautifully.
- Whipped Cream (optional): For garnishing edges, use stabilized whipped cream or canned spray for neat presentation.
Instructions
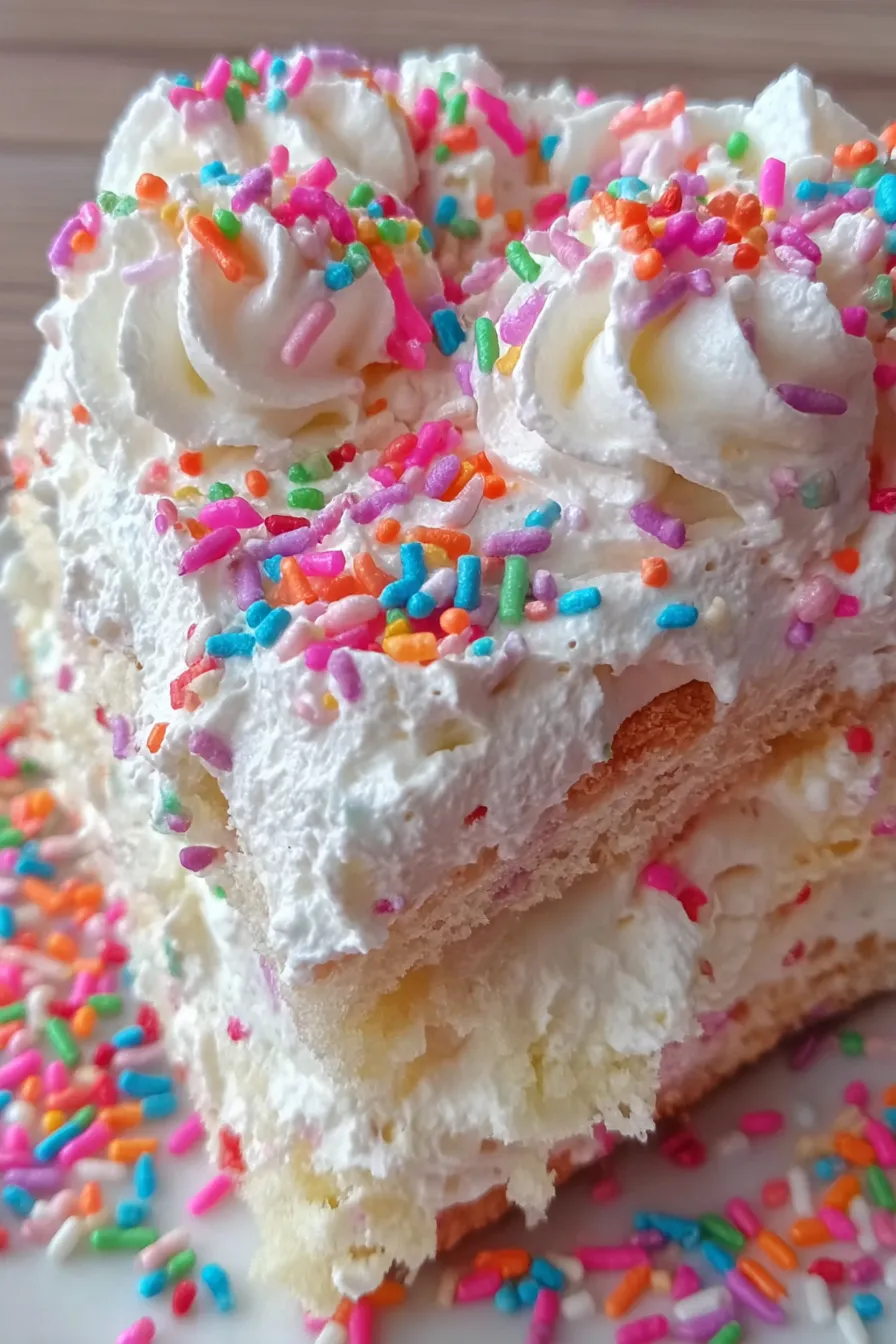
Beat the Cream Cheese: In a large bowl, use a hand mixer to beat the softened 8 oz cream cheese until light and fluffy, about 2 minutes. Scrape the bowl frequently to avoid lumps. Softening the cheese ensures a smooth emulsion when you add pudding and milk. Incorporate Pudding and Vanilla: Add the 6.8 oz instant vanilla pudding mix and 2 teaspoons vanilla extract to the whipped cream cheese. Mix briefly with the hand mixer until uniform — you’re aiming for a cohesive base, not a liquid batter. Add Milk Gradually: With the mixer running on low, slowly pour in 2 cups of milk. Blend until mostly smooth with minimal lumps; stop and scrape the bowl if necessary. The slow addition helps the pudding rehydrate evenly and prevents graininess. Fold in Whipped Topping: Gently fold 8 oz whipped topping into the pudding mixture with a rubber spatula. Fold with wide strokes to keep air in the mixture and preserve lightness. A denser mix will make the layers heavy and less pleasant on the palate. Add Sprinkles to Filling: Carefully fold in about 9 to 10 oz of rainbow sprinkles, leaving a small portion reserved for garnish. Fold just until distributed — overmixing can cause color bleeding into the filling and muddy the look. Prepare the Pan and Layer: Line the bottom of an 8-inch springform pan with parchment paper. Spread 1/2 cup of the pudding mixture evenly on the bottom. Arrange a single layer of shortbread cookies (10 oz total, break to fit) on top, pour one third of remaining pudding over the cookies, and spread. Repeat: cookies, pudding, final cookie layer, then top with remaining pudding and the reserved sprinkles. Chill and Serve: Freeze for 4 hours or refrigerate overnight to set. If frozen, let the cake sit at room temperature for 10 minutes before slicing. Carefully release the springform sides, optionally pipe whipped cream around the edges, and scatter extra sprinkles before serving.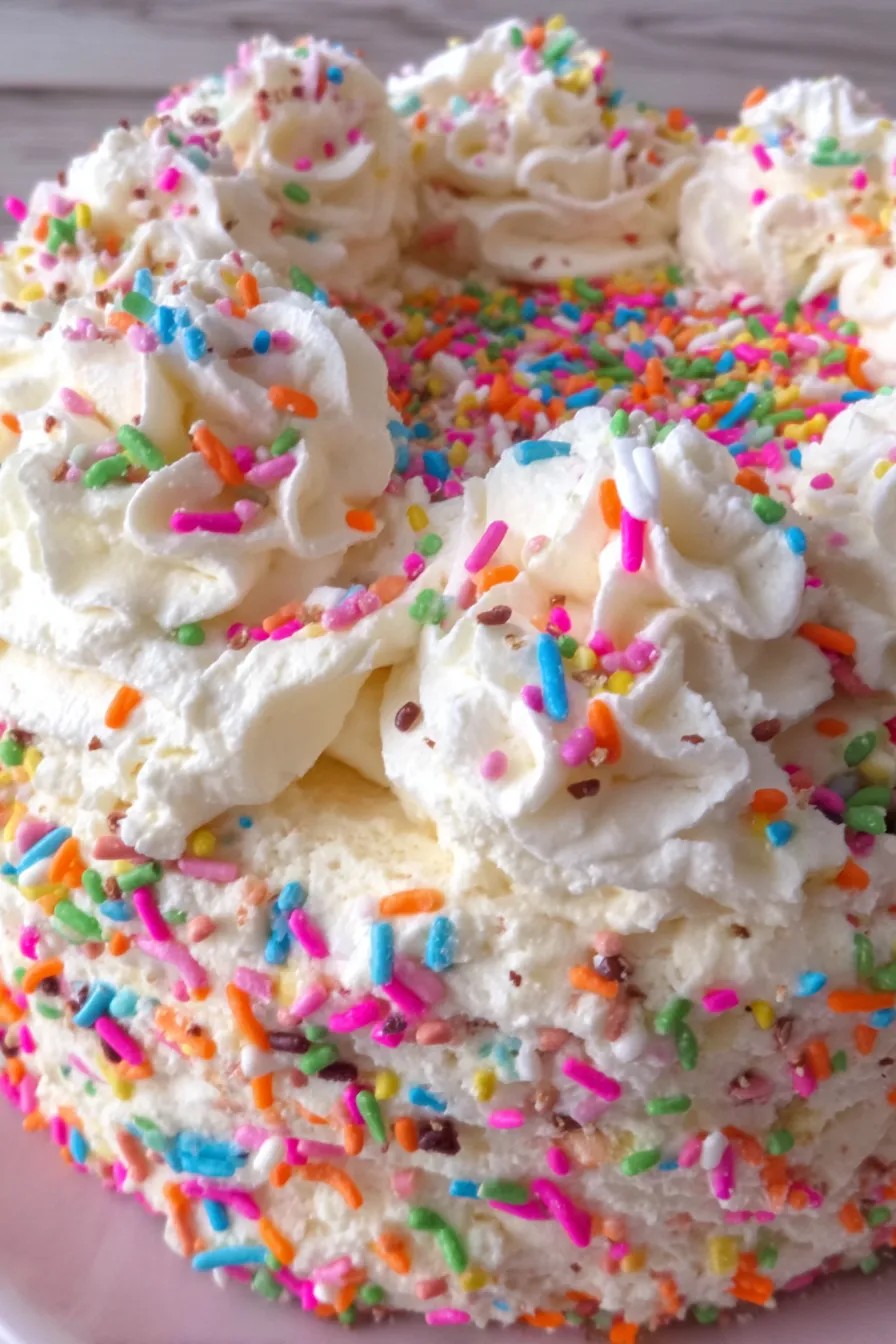
You Must Know
- This dessert freezes well for up to 1 month; thaw in the refrigerator overnight for best texture.
- Because it contains dairy and gluten, keep it refrigerated and serve within 3-4 days if stored in the fridge.
- Using room-temperature cream cheese prevents lumps and yields a silkier texture than cold mixing.
- Reserve sprinkles for the top — mixing too many into the filling can bleed color and make the filling show slight streaks.
My favorite part is watching the shortbread turn slightly soft but still maintain structure after chilling. The layered contrast — creamy, tangy filling and satisfying cookie bite — always surprises guests. On one occasion, a neighbor asked for the "recipe as a party favor" after trying a slice, which is the highest compliment in my book.
Storage Tips
Store the assembled cake in the refrigerator, covered with plastic wrap or in an airtight container, for up to 3-4 days. If you need to preserve it longer, freeze individual slices wrapped tightly in plastic and a layer of foil; they keep well up to 1 month. When reheating frozen slices, thaw them in the refrigerator overnight, then bring to room temperature for 10-15 minutes before serving to soften the cookies just enough for easy slicing. Use a hot, dry knife to cut neat slices: run the knife under hot water, dry with a towel, and slice in one smooth motion.
Ingredient Substitutions
For a lighter version, swap the full-fat cream cheese for Neufchâtel or a reduced-fat cream cheese, although the texture will be slightly less creamy. If you prefer dairy-free, use a dairy-free cream cheese and coconut whipped topping, but note the flavor will shift and sprinkles may not adhere as well; choose dairy-free cookies too. For gluten-free options, substitute gluten-free shortbread or gluten-free sandwich cookies and ensure the pudding mix is labeled gluten-free. For a more intense vanilla note, use 1 teaspoon of vanilla bean paste instead of extract.
Serving Suggestions
This delight pairs beautifully with simple accompaniments: a small bowl of fresh berries to cut the sweetness, or a tangy berry compote spooned alongside. For festive occasions, pipe stabilized whipped cream rosettes around the edge and top each with a single sprinkle cluster. Serve chilled slices on colorful dessert plates to echo the funfetti theme. It also works as individual portions in jars for picnics — layer cookie pieces and filling in small mason jars and chill until set.
Cultural Background
Layered chilled sweets have roots in many cuisines, from icebox cakes popularized in 20th-century America to European chilled custard desserts. The icebox cake tradition evolved as refrigerators became common, enabling no-bake layered desserts that rely on chilling rather than baking. My funfetti version is a playful American take that borrows the tactile layering of classic icebox cakes and adds the celebratory vibe of rainbow sprinkles, a nod to birthday-cake flavors and mid-century convenience cooking.
Seasonal Adaptations
Adapt this for seasons easily: add warm spices (1/2 teaspoon cinnamon) and toasted pecans for autumnal flair, or swap sprinkles for chopped freeze-dried strawberries and white chocolate curls in spring. For summer, include a layer of lemon curd between cookies and filling for brightness. During holidays, use colored sprinkles to match themes — red and green for winter, pastel for Easter — and consider swapping vanilla pudding for chocolate for a richer winter treat.
Meal Prep Tips
Make the filling the day before and store it chilled in an airtight container; assemble the layers a few hours before serving. If preparing for a party, build the cake in the morning and chill all day. Portion into individual jars the night before for grab-and-go desserts: crumble cookies into the bottom, spoon in filling, and top with sprinkles right before serving to keep colors vibrant. Label containers with date and contents if freezing portions.
This Funfetti Icebox Cake Delight is a joyful, simple dessert that rewards minimal effort with big smiles. Whether you’re sharing it at a party or enjoying a quiet slice with coffee, it’s a friendly, colorful treat that invites customization and makes dessert time feel celebratory.
Pro Tips
Soften cream cheese to room temperature for at least 30 minutes to avoid lumps and ensure a silky filling.
Reserve some sprinkles for garnish to prevent color bleeding and keep the layers visually clean.
Use a hot, dry knife (wiped clean between cuts) for neat slices; run under hot water, dry, and slice in one motion.
This nourishing funfetti icebox cake delight recipe is sure to be a staple in your kitchen. Enjoy every moist, high protein slice — it is perfect for breakfast or as a wholesome snack any time.
FAQs about Recipes
Can I freeze this cake?
Yes — if frozen, let the cake sit at room temperature for 10 minutes before slicing for clean slices and tender cookies.
Why is my filling lumpy?
Use softened full-fat cream cheese for the best, smooth texture. Cold cream cheese will leave lumps.
How do I prevent color bleeding from the sprinkles?
Reserve some sprinkles for the top to keep the filling bright; mixing all sprinkles into the filling can cause color bleeding.
Tags
Funfetti Icebox Cake Delight
This Funfetti Icebox Cake Delight recipe makes perfectly juicy, tender, and flavorful steak every time! Serve with potatoes and a side salad for an unforgettable dinner in under 30 minutes.
Ingredients
Filling
Assembly
Instructions
Beat the Cream Cheese
Beat 8 oz softened cream cheese in a large bowl with a hand mixer until light and fluffy, about 2 minutes. Scrape the sides to ensure even texture.
Add Pudding and Vanilla
Add 6.8 oz instant vanilla pudding mix and 2 teaspoons vanilla extract to the cream cheese. Mix until smooth and uniform using a hand mixer.
Pour in Milk
Gradually pour in 2 cups milk while mixing on low. Blend until mostly smooth with minimal lumps, scraping bowl if needed.
Fold in Whipped Topping
Gently fold 8 oz whipped topping into the pudding mixture with a rubber spatula to preserve air and lightness.
Incorporate Sprinkles
Carefully fold in about 9 to 10 oz rainbow sprinkles, reserving some for garnish. Fold just until combined to avoid color bleeding.
Assemble Layers
Line an 8-inch springform pan with parchment. Spread 1/2 cup filling on the bottom, layer shortbread cookies to fit, pour one third of remaining filling and spread. Repeat and finish with reserved filling and sprinkles on top.
Chill and Serve
Freeze for 4 hours or refrigerate overnight. If frozen, let sit at room temperature for 10 minutes before slicing. Remove springform sides and garnish with whipped cream and extra sprinkles, if desired.
Last Step: Please leave a rating and comment letting us know how you liked this recipe! This helps our business to thrive and continue providing free, high-quality recipes for you.
Nutrition
Did You Make This?
Leave a comment & rating below or tag
@epicula on social media!
Categories:
You might also like...

Mississippi Mud Brownies
Ultra-fudgy brownies crowned with toasted mini marshmallows and warm cocoa icing, with molten chocolate pockets in every bite.

Buttery Pecan Pie Bars
Buttery shortbread crust topped with a gooey brown sugar pecan filling. Just 10 minutes to prep for bakery-worthy bars with irresistible crunch.

Crack-Free Pumpkin Cheesecake
Ultra-creamy pumpkin cheesecake with a graham crust, bakes without cracks, and shines with caramel and rum-kissed whipped cream.
Did You Make This?
Leave a comment & rating below or tag @epicula on social media!
Rate This Recipe
Share This Recipe
Enjoyed this recipe? Share it with friends and family, and don't forget to leave a review!
Comments (1)
This recipe looks amazing! Can't wait to try it.
Comments are stored locally in your browser. Server comments are displayed alongside your local comments.

Hi, I'm Olivia!
What's Popular

30-Minute Meals!
Join to receive our email series which contains a round-up of some of our quick and easy family favorite recipes.