
>>

Velvety red cake base topped with a tangy cheesecake center—perfectly sized mini treats that bake in minutes and travel beautifully.
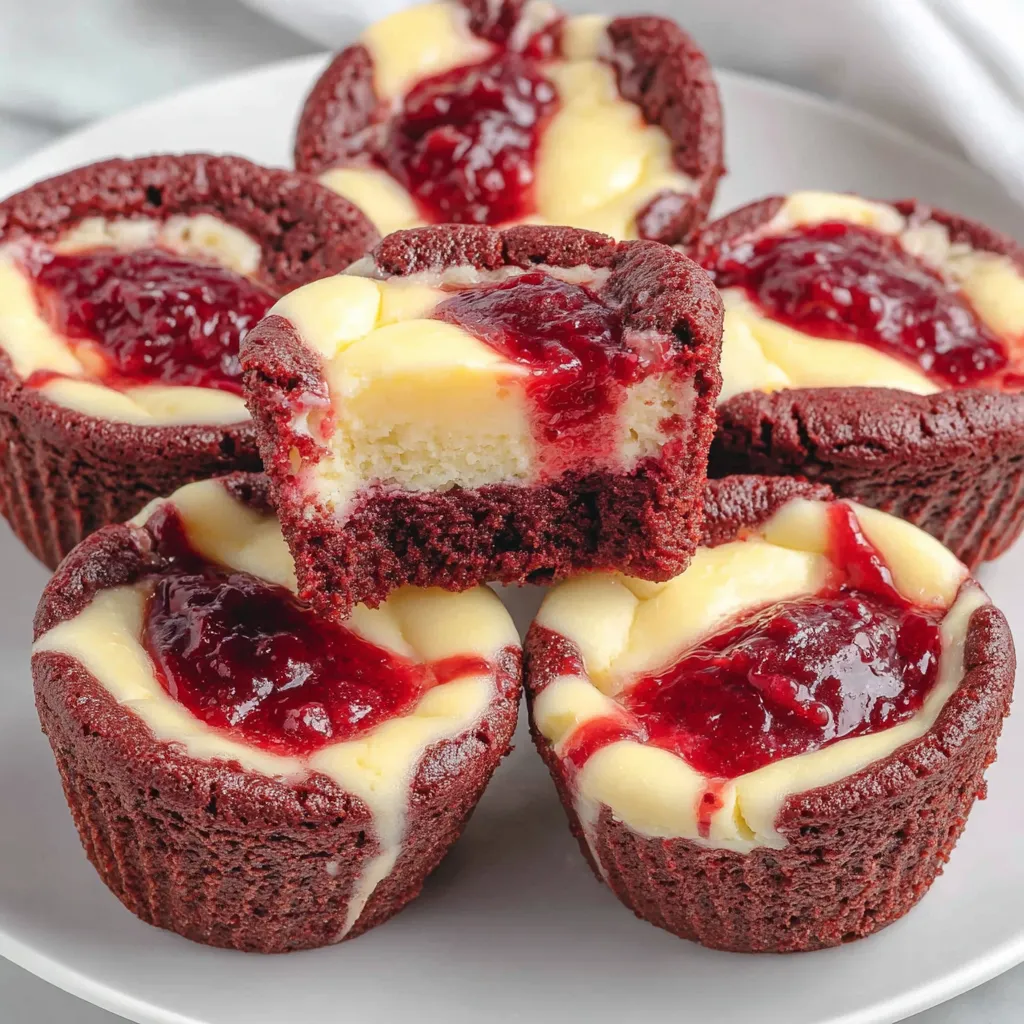
This batch of mini red velvet cheesecake bites is one of those recipes I turn to when I want a small, elegant dessert that feels special without a lot of effort. I first developed this version on a rainy afternoon when I wanted something festive for a small gathering but didn’t want to commit to a whole layer cake. The idea of a rich red base paired with a creamy, slightly tangy cheesecake center was irresistible. The contrast—soft, tender cake and a silky cream cheese dot in the center—creates a bite that’s both nostalgic and refined.
I remember the moment I took the first tray out of the oven: the kitchen smelled of cocoa and butter, and the small domes had the slightest jiggle in the center where the cheesecake sat. My family gathered around and declared them perfect. They’re ideal for holidays, potlucks, or when you want something that looks bakery-made with home-style comfort. The recipe is forgiving, fast, and uses pantry-friendly ingredients with just a touch of a specialty item—red gel color—to get that classic look.
Personally, these bites became a staple after my neighbor asked for something small and celebratory for her book club. They disappeared in two sittings. I love how the cream cheese center keeps each bite moist and the red base adds color without overwhelming the palate. They’re both playful and grown-up, which is a rare combination.

My favorite aspect is how forgiving the assembly is: spills are tiny and any irregularities look charming rather than flawed. At a recent family dinner, guests loved the contrast of the velvety red base with the tangy, silky center—several people came back for seconds and one guest asked for the recipe on the spot. The ease of portion control is a big advantage; everyone gets a small, satisfying dessert without leftovers piling up.

Store cooled bites in an airtight container in the refrigerator for up to 5 days. Layer parchment or wax paper between layers to prevent sticking. To freeze, arrange on a baking sheet until solid (about 1 hour), then transfer to a freezer-safe bag or container; frozen bites keep up to 3 months. When reheating, remove from the refrigerator 20 minutes before serving for the best texture. If you prefer warm, briefly reheat single bites in a 300°F oven for 6 to 8 minutes—watch carefully so the filling doesn’t over-soften.
For a dairy-free version, swap cream cheese for a firm vegan cream cheese and use a plant-based butter alternative; baking behavior changes slightly so reduce oven time by 1 minute and chill longer. To make gluten-free bites, use a 1:1 gluten-free flour blend and add 1/8 teaspoon xanthan gum if your blend lacks binding agents. If you don’t have gel coloring, use 2 teaspoons of liquid food coloring but omit any extra milk—expect a slightly paler color. For a richer filling, fold in 1 tablespoon of sour cream.
Serve chilled or at room temperature. Garnish with a light dusting of powdered sugar, a small dollop of whipped cream, or a few chocolate shavings. These bites pair beautifully with a strong coffee or a crème-based dessert wine. For a celebration, arrange them on a tiered dessert stand; they also make elegant additions to holiday cookie trays and boxed gifts. Add a sprig of fresh mint for color contrast and aroma.
Red velvet has roots in American baking traditions dating back to the early 20th century, when its distinctive color and subtle cocoa flavor became associated with Southern hospitality and layered celebration cakes. The cream cheese component nods to cheesecake traditions that traveled and evolved in American kitchens. Miniaturizing classic desserts—like turning a layered red velvet cake into bite-sized cheesecakes—is part of a contemporary trend celebrating portion control and elegant entertaining.
In winter, fold a pinch of cinnamon and a teaspoon of orange zest into the batter for a festive twist. For spring, top each bite with a small edible flower petal or freeze-dried raspberry powder. During summer barbecues, serve chilled with a mint garnish and lighter accompaniments. Holiday versions can include a streusel crumb topping or a white chocolate drizzle for added decadence.
Make the base and the filling separately the day before—store the red velvet batter refrigerated in a covered bowl (bring to room temperature before scooping) and the filling chilled in a piping bag. Assemble and bake the next day for freshly baked texture with minimal same-day work. Use a cookie scoop for consistent base portions and a small scooper for the filling to streamline assembly. Label containers with date and contents when freezing batches.
These mini red velvet cheesecake bites capture both nostalgia and finesse. They travel well, look stunning on a platter, and reward you with consistent, bakery-quality results at home. Give them a try at your next gathering and make the recipe your own with seasonal touches and flavor swaps. Happy baking!
Soften cream cheese to room temperature for a smooth filling and avoid lumps when mixing.
Use gel food coloring to achieve vivid red without altering batter consistency.
Chill the bites for at least 30 minutes after baking to let the filling set for cleaner bites.
Line or grease the mini pan well; nonstick spray with flour works best to release delicate bites.
This nourishing mini red velvet cheesecake bites recipe is sure to be a staple in your kitchen. Enjoy every moist, high protein slice — it is perfect for breakfast or as a wholesome snack any time.
This Mini Red Velvet Cheesecake Bites recipe makes perfectly juicy, tender, and flavorful steak every time! Serve with potatoes and a side salad for an unforgettable dinner in under 30 minutes.
Preheat the oven to 350°F and thoroughly spray a 24-cup mini muffin pan with nonstick spray or line with mini liners. Preheating ensures even baking and proper set of the small portions.
Whisk together 1 cup all-purpose flour, 1/4 cup unsweetened cocoa powder, and 1 tablespoon cocoa powder in a small bowl until evenly blended and free of lumps.
In a medium bowl whisk melted and cooled 3/4 cup salted butter, 1 1/4 cups sugar, 1 tablespoon red gel color, 2 teaspoons vanilla, and the 2 beaten eggs until homogeneous but not overly aerated.
Fold the dry ingredients into the wet mixture until just combined. Stir gently to avoid overdeveloping gluten; batter should be thick and spoonable.
Beat 8 ounces softened cream cheese for 1 minute, then add 1/4 cup sugar and 1 teaspoon vanilla and beat 1 to 1 1/2 minutes. Add 1 egg yolk and mix until no streaks remain.
Add about 1 tablespoon of red velvet batter into each mini cup. Pipe or spoon about 2 teaspoons of cheesecake filling into the center of each red velvet portion.
Bake at 350°F for 8 to 9 minutes until the edges are set and the centers have a slight jiggle. Cool in the pan 20 to 30 minutes, then transfer to a wire rack to cool completely; chill 30 minutes before serving if possible.
Last Step: Please leave a rating and comment letting us know how you liked this recipe! This helps our business to thrive and continue providing free, high-quality recipes for you.
Leave a comment & rating below or tag
@epicula on social media!

Ultra-fudgy brownies crowned with toasted mini marshmallows and warm cocoa icing, with molten chocolate pockets in every bite.

Buttery shortbread crust topped with a gooey brown sugar pecan filling. Just 10 minutes to prep for bakery-worthy bars with irresistible crunch.

Ultra-creamy pumpkin cheesecake with a graham crust, bakes without cracks, and shines with caramel and rum-kissed whipped cream.
Leave a comment & rating below or tag @epicula on social media!
Enjoyed this recipe? Share it with friends and family, and don't forget to leave a review!
This recipe looks amazing! Can't wait to try it.
Comments are stored locally in your browser. Server comments are displayed alongside your local comments.

Join to receive our email series which contains a round-up of some of our quick and easy family favorite recipes.
