
>>

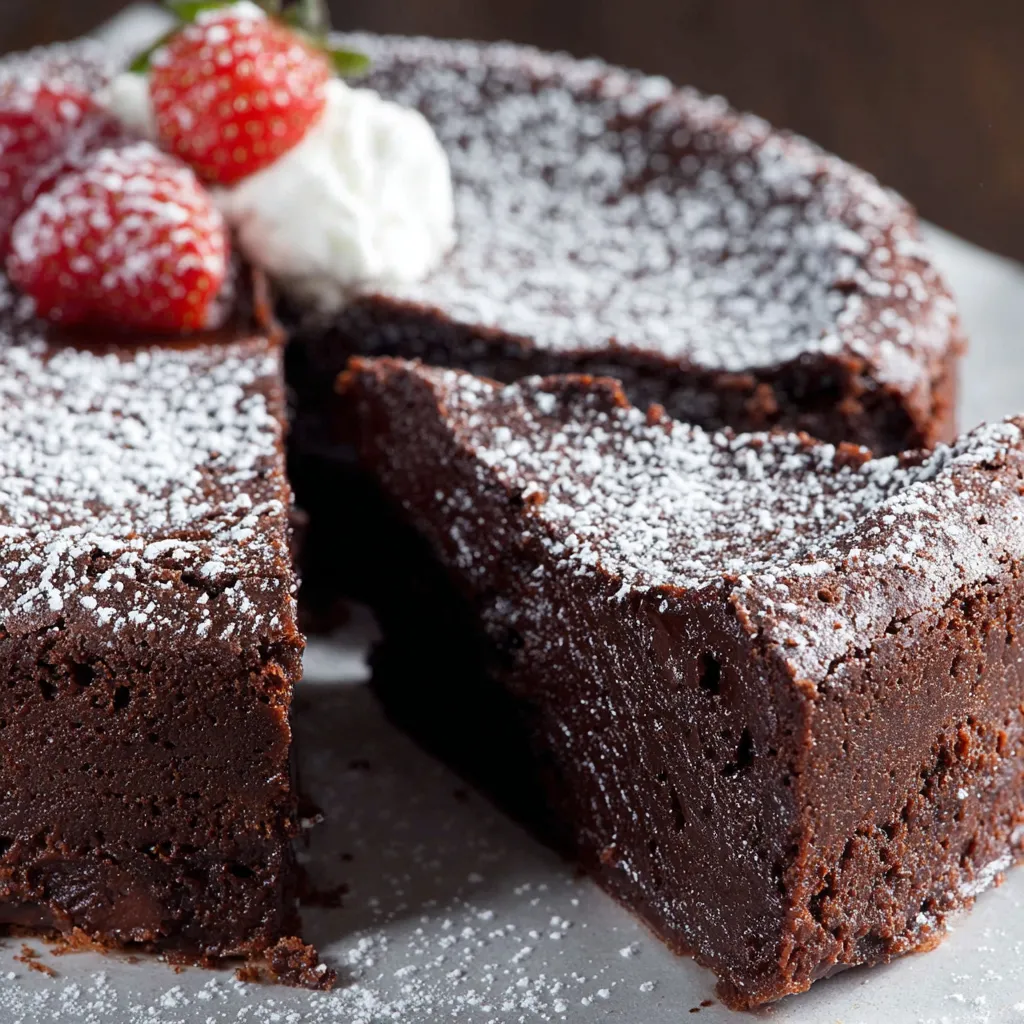
An intensely chocolate, naturally gluten-free cake with a custardy center and a glossy top — chilled, sliced, and served with whipped cream or berries.
This flourless chocolate cake has been one of my most cherished desserts for years. I first learned this method during a small dinner party when I wanted something deeply chocolatey but simple to make. The cake’s texture is what makes it unforgettable: a crisp, thin exterior that gives way to a dense, custard-like interior that melts on the tongue. Every time I make it, the house fills with the rich aroma of chocolate and butter, and guests gravitate to the kitchen before dinner finishes.
I discovered a few small technique tweaks over time — chilling the cake overnight improves texture and sliceability, folding in whipped cream lightens the batter just enough, and using a light-colored, deep 8-inch pan helps the cake bake evenly. I usually pair it with tart berries and freshly whipped cream so the sweetness is balanced. It’s a showstopper for birthdays, intimate dinners, or whenever you want a simple dessert that tastes like a bakery specialty without hours of work.
I remember the first time I served this to my family: my usually picky teenage cousin went back for thirds and announced it was the best chocolate cake she’d ever had. Over the years friends have adopted the method, and the common comment is always the same — it tastes far fancier than the effort required. That simple surprise makes this one of my go-to desserts for both weekday treats and special occasions.
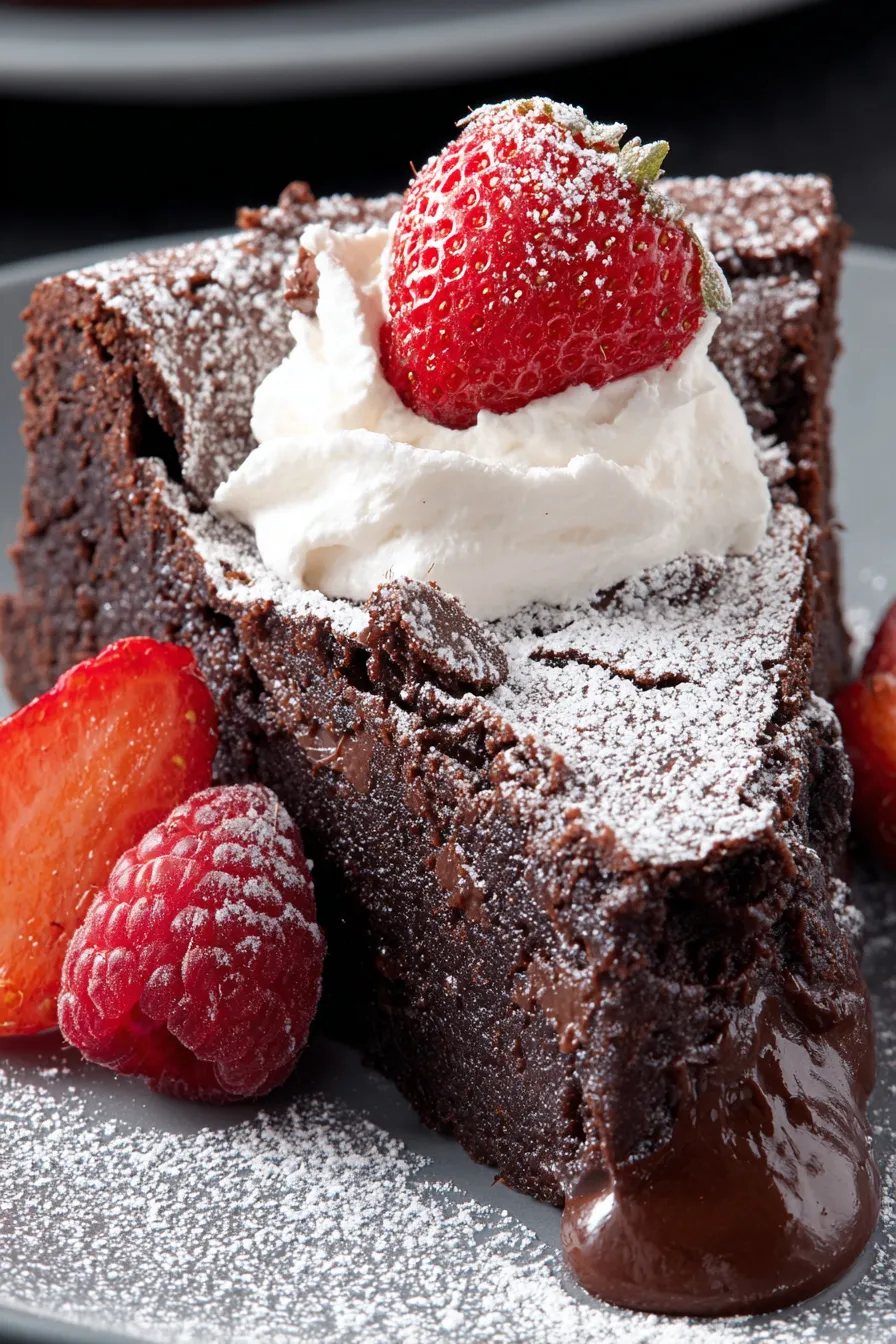
One of my favorite things about this cake is how it feels like a secret indulgence. It looks elegant but is forgiving: small cracks on top add rustic charm, and the slight wobble after baking signals the perfect custard center. Family members often comment on the layered textures — a delicate outer crust with a velvety interior — and the contrast of bright berries or cool ice cream truly brings the dessert to life.
Store the cake covered in the refrigerator for up to three days. Use an airtight cake container or wrap the pan tightly with plastic wrap to protect it from fridge odors and to prevent drying. For longer storage, wrap individual slices in plastic and place them in a freezer-safe container; they keep well for up to three months. To serve from frozen, thaw slices overnight in the refrigerator, then bring to slightly less than room temperature for the best texture — too warm and the interior can become too soft.
If you don’t have semisweet chips, finely chop a good-quality chocolate bar (around 60–70% cacao) and use the same volume. Swap Dutch-process cocoa for natural cocoa but reduce baking soda if the original called for leavening; this version uses no flour so the swap mainly affects acidity and color. For a dairy-free version, replace butter with a plant-based butter substitute and use coconut cream whipped to medium peaks in place of heavy cream, though flavor will shift. Omit espresso powder if you dislike coffee notes; it only boosts chocolate depth.

Serve slices chilled with a dusting of powdered sugar and a scoop of vanilla ice cream or a dollop of softly whipped cream. For color and acidity, add fresh strawberries, raspberries, or a few segments of blood orange. For a celebratory finish, spoon warm 1:1 ganache over each slice so it glistens and sings against the dense cake. For elegant plating, use mint leaves and a few whole berries as a garnish and serve on small plates with dessert forks.
Flourless chocolate cakes have roots in European patisserie, particularly in Italy and France where dense, custard-like chocolate cakes are a classic. They became popular where rich chocolate and eggs were prized — the absence of flour concentrates chocolate flavor and appeals to those seeking naturally gluten-free desserts. Regional variations include mousse-like versions or those finished with a dusting of cocoa or a thin glaze. This style honors the simplicity of quality chocolate and precise technique rather than elaborate decoration.
Make the batter up to the point of baking and refrigerate for a few hours if needed, though best results come from baking immediately and then chilling. Bake the day before you serve so the cake can chill overnight; this frees up event time and enhances texture. Slice with a knife warmed under hot water between cuts for clean edges. Store leftover slices in single layers separated by parchment for easy grab-and-go desserts during the week.
This cake is one of those desserts that feels like a small luxury — easy to make yet impressive to serve. Take your time with the cooling and chilling steps, and don’t be afraid to pair it with bright, acidic berries to balance the richness. Share it with good company and you’ll create the kind of dessert memory that gets requested again and again.
Cool the cake for 10 minutes in the pan, then chill at least 6 hours to achieve a stable custard center.
Warm the knife under hot water and wipe it dry between slices for clean, glossy cuts.
Use a light-colored 8-inch deep pan to prevent over-browning and encourage even baking.
Whip the heavy cream to medium peaks — overwhipping will make it difficult to fold into the batter.
Use instant espresso powder to enhance chocolate depth without adding a coffee flavor.
This nourishing silky flourless chocolate cake recipe is sure to be a staple in your kitchen. Enjoy every moist, high protein slice — it is perfect for breakfast or as a wholesome snack any time.
Yes. Wrap tightly and freeze up to 3 months. Thaw overnight in the refrigerator before serving.
Chill at least 6 hours but preferably overnight for best texture and clean slicing.
This Silky Flourless Chocolate Cake recipe makes perfectly juicy, tender, and flavorful steak every time! Serve with potatoes and a side salad for an unforgettable dinner in under 30 minutes.
Preheat oven to 350°F. Grease an 8-inch round, 3-inch deep light-colored pan with nonstick spray, line the bottom with parchment, and spray again.
Melt 1 1/4 cups chocolate chips and 1 stick butter in 30-second microwave bursts or a double boiler until smooth. Let cool to warm.
Whisk in 3/4 cup sugar, 1 teaspoon espresso powder if using, 1/4 teaspoon salt, and 1 teaspoon vanilla until combined and slightly cooled.
Add 3 eggs plus 1 yolk all at once and whisk vigorously until smooth and slightly aerated.
Whisk in 1/2 cup Dutch-process cocoa until just combined; the batter will be thick and glossy.
Whip 1/2 cup chilled heavy cream to medium peaks then gently fold it into the batter with a rubber spatula until uniform.
Pour batter into the prepared pan and bake 25–30 minutes until edges are set and center reads at least 200°F but is still slightly wobbly. Cool 10 minutes, then refrigerate uncovered or loosely covered at least 6 hours.
Loosen edges, invert onto a plate, slice with a warmed knife, dust with powdered sugar, and top with whipped cream or berries.
Last Step: Please leave a rating and comment letting us know how you liked this recipe! This helps our business to thrive and continue providing free, high-quality recipes for you.
Leave a comment & rating below or tag
@epicula on social media!

Ultra-fudgy brownies crowned with toasted mini marshmallows and warm cocoa icing, with molten chocolate pockets in every bite.

Buttery shortbread crust topped with a gooey brown sugar pecan filling. Just 10 minutes to prep for bakery-worthy bars with irresistible crunch.

Ultra-creamy pumpkin cheesecake with a graham crust, bakes without cracks, and shines with caramel and rum-kissed whipped cream.
Leave a comment & rating below or tag @epicula on social media!
Enjoyed this recipe? Share it with friends and family, and don't forget to leave a review!
This recipe looks amazing! Can't wait to try it.
Comments are stored locally in your browser. Server comments are displayed alongside your local comments.

Join to receive our email series which contains a round-up of some of our quick and easy family favorite recipes.
