The Grinch Cookies | Epicula
30-MINUTE MEALS! Get the email series now
Royal Recipe

The Grinch Cookies

5 from 1 vote
1 Comments
Olivia Grace
By: Olivia GraceUpdated: Jan 21, 2026
This post may contain affiliate links. Please read our disclosure policy.

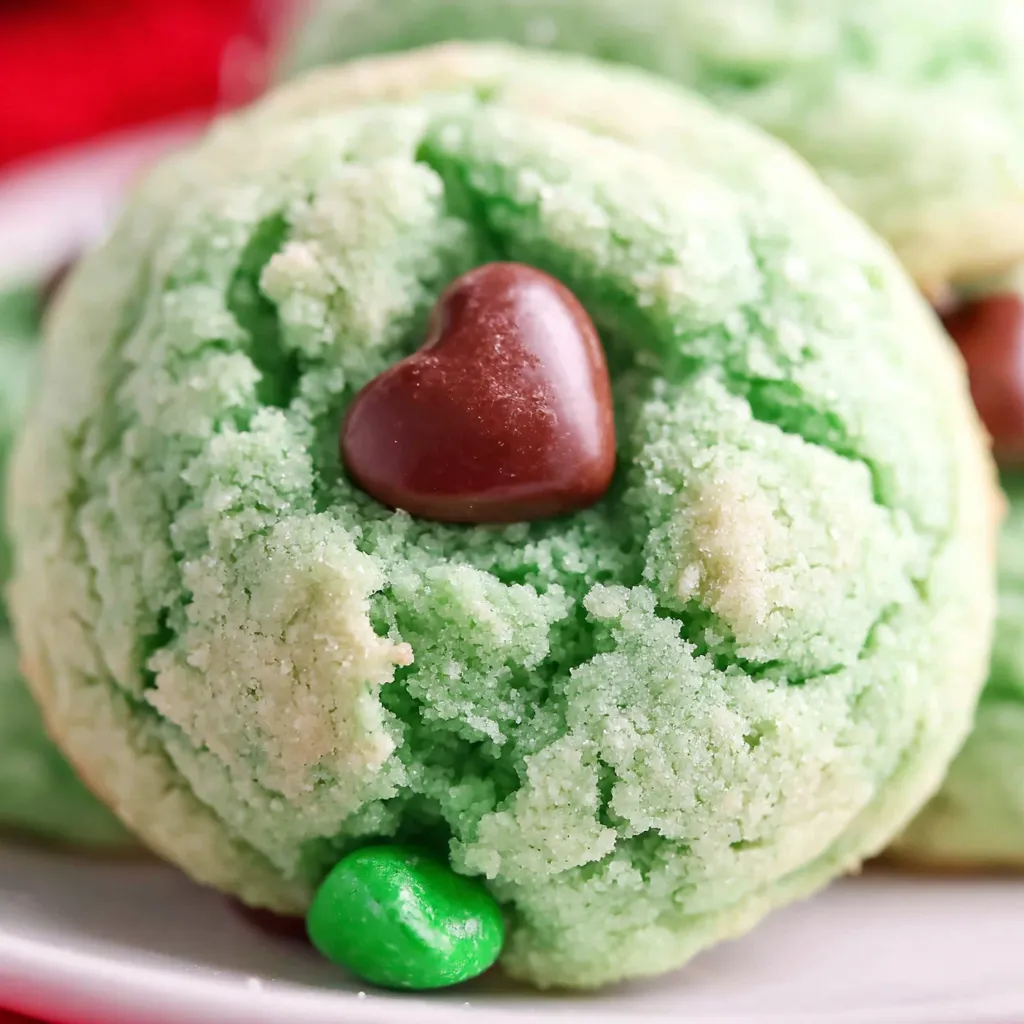
A festive, stuffed sugar cookie shaped in mini cups with a Hershey’s Kiss center and a heart sprinkle — perfect for holiday parties and cozy gatherings.

The Grinch Cookies
This recipe started as a playful holiday project and quickly became a family favorite. The Grinch Cookies are small, vibrant green sugar-cookie cups with a chocolate surprise tucked inside and a single heart candy pinned on top. I first made these at a holiday cookie swap when I wanted something that looked whimsical on the platter but stayed tidy on a napkin. The texture combines a tender sugar-cookie shell with a warm, semi-melted chocolate center; the result is both nostalgic and impressive without being fussy. Over the years I’ve adapted the method to be reliably simple: a thick dough formed around a Hershey's Kiss, baked in a mini muffin tin so every cookie comes out uniformly shaped. The chew of the cookie contrasts beautifully with the soft chocolate center and the bright pop of the candy heart. They’re quick enough for an afternoon baking session with kids, and elegant enough for a holiday party. I keep a bag of heart sprinkles and green gel food coloring on hand around December — they transform ordinary cookie mix into something festive.

Why You'll Love This Recipe

  • Fast and approachable: ready from pantry to platter in about 30 minutes, including a short bake time; perfect for last-minute cookie swaps or after-school baking.
  • Minimal ingredients: uses a premade sugar-cookie mix plus a handful of pantry staples and 18 Hershey's Kisses for an effortless, crowd-friendly result.
  • Kid-friendly assembly: kids enjoy shaping the dough and nesting the chocolate, making it a great activity for holiday afternoons.
  • Beautiful presentation: the bright green color and offset heart candy create a charming bite-sized treat that looks custom-made.
  • Make-ahead friendly: dough can be shaped and chilled, or the baked cookie cups freeze well for stress-free entertaining.
  • Flexible swaps: easily adapted for different flavors by switching chocolate type, cookie mix brand, or sprinkle shapes.

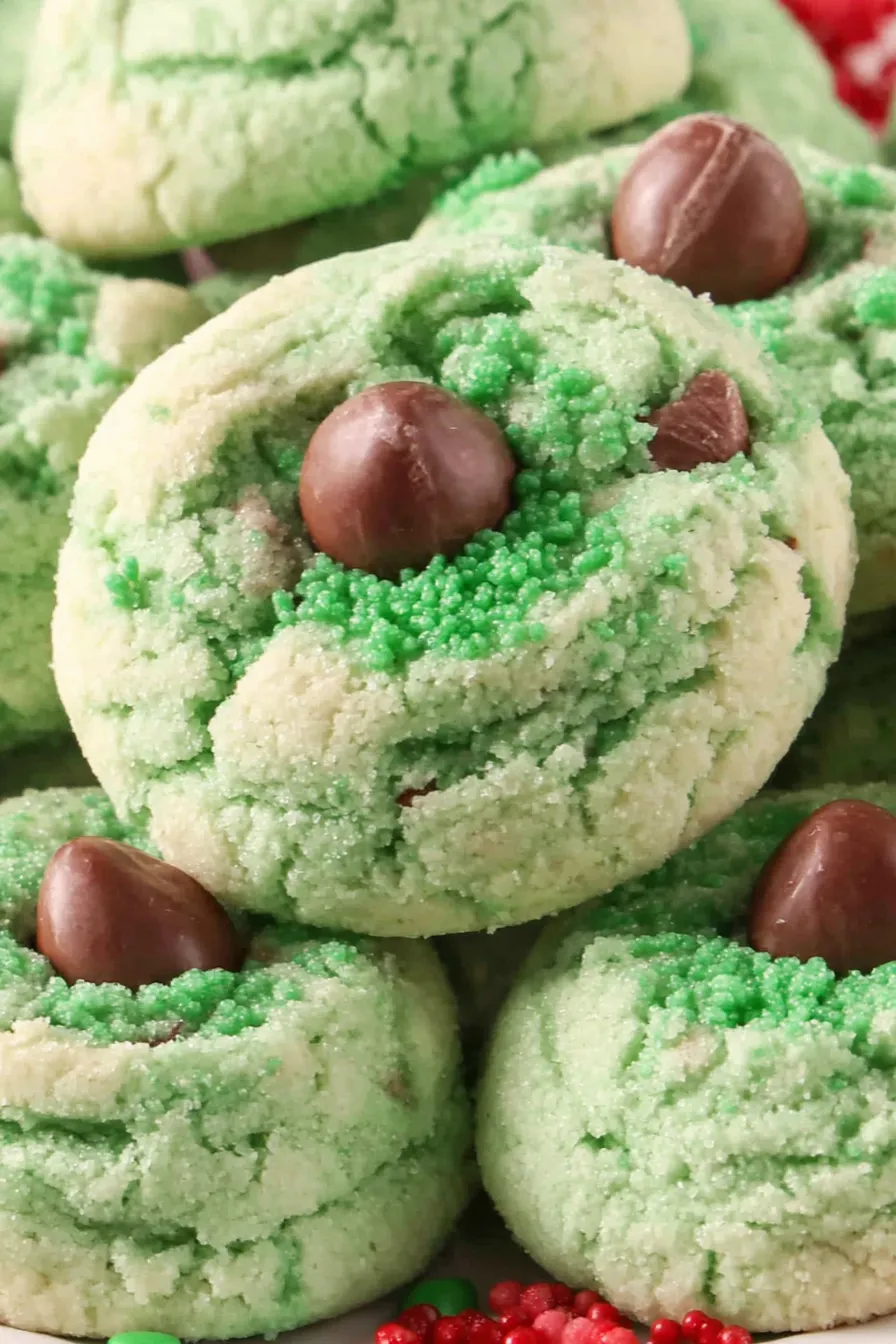
Every year when I bring these to family gatherings, my mother lights up at the sight of the little hearts — she says they look like tiny presents. Neighbors have asked for the recipe after sampling one at a cookie exchange, and I love how a simple combination of store-bought mix and a little creativity can produce something so memorable.

Ingredients

  • Hershey's Kisses (18): Use standard milk chocolate Kisses, unwrapped. The upright chocolate center softens but holds its shape when baked inside the cookie cup. If using dark chocolate or seasonal Kisses, expect a slightly firmer or richer center.
  • Sugar cookie mix (17.5 ounces): A 17.5-ounce pouch (for example, Pillsbury or your preferred brand) gives a balanced sweetness and structure; the convenience shortens prep time and ensures consistent texture.
  • All-purpose flour (1/4 cup): Adds a little extra structure so the dough can be formed around the chocolate without collapsing; spoon and level when measuring.
  • Large egg (1): Beats with the food coloring to bind the dough and contribute to tenderness; use a room-temperature egg for even mixing.
  • Unsalted butter (1/2 cup): Room temperature butter introduces richness and helps the dough hold together; do not use melted butter — it will make the dough too loose.
  • Green gel food coloring (3/4 teaspoon): Gel provides vivid color without thinning the dough; start with 3/4 teaspoon and adjust for deeper hues.
  • Heart candy sprinkles (18): One per cookie for the signature look; pick a flat candy that presses easily onto the warm cookie without melting.
  • Baker's spray or paper mini muffin liners: Lightly grease tins or line with paper cups to prevent sticking and keep edges tidy.
User provided content image 2

Instructions

Preheat and prepare: Preheat the oven to 375°F. Lightly spray a mini muffin pan with baker's spray, or place mini paper liners into each cavity. Preparing the tin first prevents last-minute scrambling and ensures cookies release cleanly once baked. Color the egg: In a small bowl, whisk the large egg with 3/4 teaspoon green gel food coloring until uniformly green. Gel color disperses better when combined with the egg first, giving more consistent dough color without over-mixing the butter. Make the dough: In a large mixing bowl, combine the 17.5-ounce sugar cookie mix, 1/4 cup all-purpose flour, 1/2 cup room-temperature unsalted butter, and the colored egg. With a handheld mixer on low speed, mix for 2 to 3 minutes until the ingredients are thoroughly incorporated and the dough is very thick. Scrape the bowl often to ensure even mixing; do not overbeat or the cookies can become tough. Portion and stuff: Use a 1-1/2 tablespoon (approximately 1-1/2-inch) cookie scoop to portion the dough. Flatten each ball into a 3-inch disk in your hand, place one unwrapped Hershey's Kiss in the center upright, and carefully fold the dough around the chocolate, sealing and reshaping into a ball. Keeping the Kiss upright helps the chocolate settle evenly in the center while baking. Bake: Arrange the stuffed dough balls into the prepared mini muffin tin, ensuring the Hershey's Kiss remains upright when placed. Bake at 375°F for 10 to 12 minutes; the edges should be set but not browned. The centers will still be soft — you want the cookie shell fully cooked but tender. Finish and cool: Immediately after removing the pan from the oven, press one heart candy sprinkle onto each cookie cup offset slightly to the right of center. Allow cookies to cool in the mini muffin tin for at least 10 minutes to set, then transfer to a wire rack to cool completely. Cooling in the tin helps the cookie hold its cup shape and prevents the chocolate from leaking out. User provided content image 1

You Must Know

  • These keep well in an airtight container at room temperature for 3 days or refrigerated for up to 7 days; they also freeze flat for up to 3 months.
  • Because the dough is intentionally thick, do not add liquid; if dough feels crumbly, let it rest 5 minutes and press together with slightly warmed hands.
  • Do not brown the edges; removing the cookies before browning keeps them tender and preserves the green color contrast with the chocolate.
  • Allergen note: contains egg and dairy; cookie mix may contain wheat and other allergens — always check labels.

My favorite part is the reveal: when a guest bites into the little cup and the warm chocolate greets them. Over the years I’ve learned small touches — like pressing the heart on warm cookies and keeping the Kiss upright — make the presentation consistently delightful.

Storage Tips

Store these in a single layer in an airtight container to avoid squashing the heart candy. At room temperature they remain fresh for about 3 days; refrigeration extends life to about 7 days but can slightly firm the cookie. For longer storage, freeze on a baking sheet until solid, then transfer to a freezer-safe container for up to 3 months. To thaw, place cookies on the counter for 30 to 60 minutes — do not microwave, as sudden heat can over-soften the chocolate and damage the cookie structure.

Ingredient Substitutions

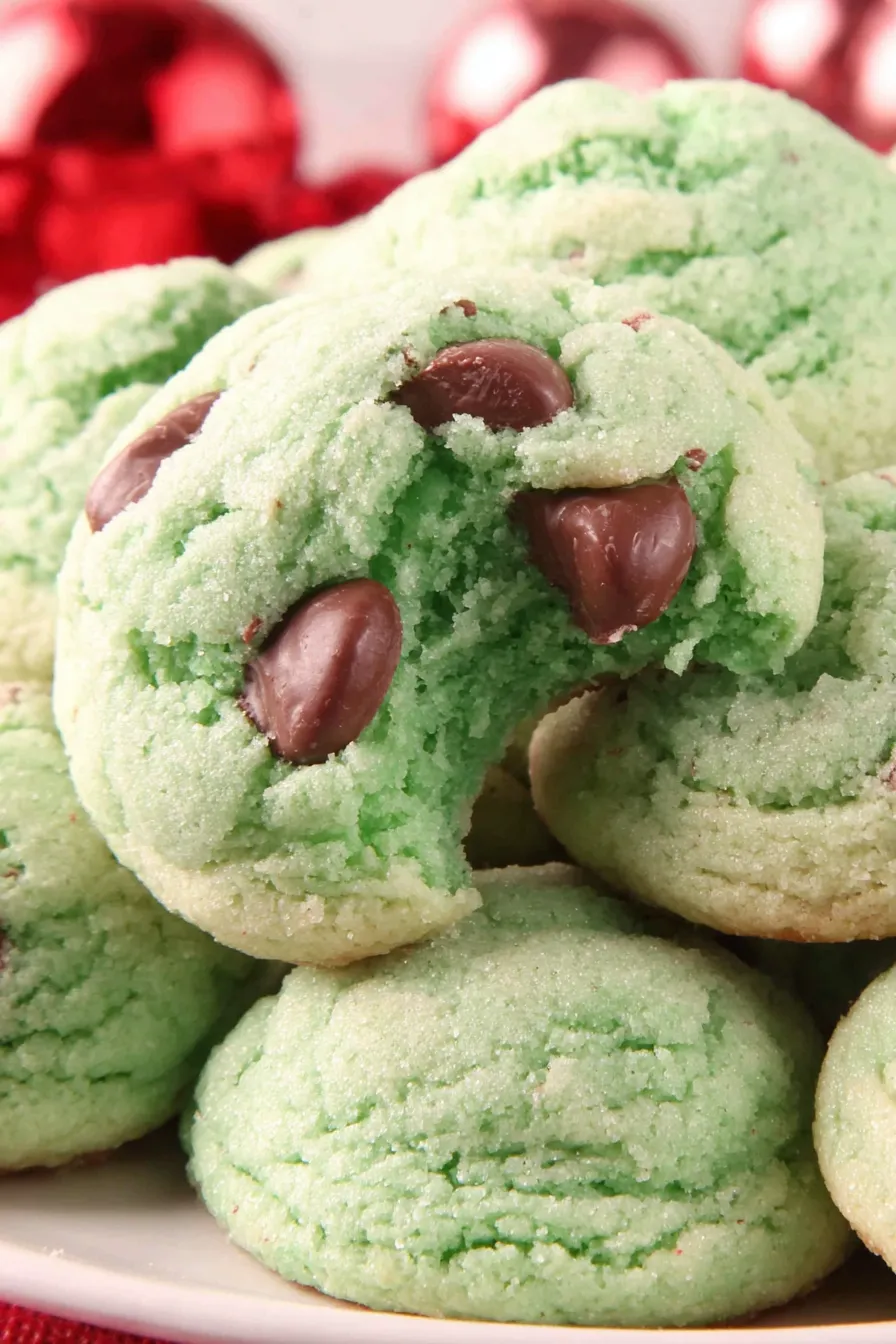
If you prefer a different chocolate center, swap Hershey's Kisses for Rolo candies (caramel + chocolate) for a gooey surprise, or use dark chocolate Kisses for a richer bite. For a dairy-free version, select dairy-free chocolate Kisses and a dairy-free butter substitute, though texture may be slightly different. Gluten-free cookie mix can replace the regular sugar-cookie mix, but add a tablespoon of additional flour-like binder (such as a gluten-free flour blend) to help the dough hold shape around the candy.

Serving Suggestions

Arrange these on a holiday platter with powdered-sugar-dusted cookies, peppermint bark, and shortbread for a festive spread. They’re excellent served alongside hot cocoa or a coffee bar; the warm center pairs particularly well with steamed milk drinks. Garnish each plate with a few fresh cranberries or rosemary sprigs to accent the green color and add a seasonal flourish.

User provided content image 2

Cultural Background

Stuffed cookies and filled confections have long been part of festive baking traditions across many cultures. The idea of enclosing chocolate within cookie dough echoes older European filled-biscuit traditions, but these little cups are a modern American twist inspired by holiday character themes — in this case, the Grinch’s green hue. The playful colors and heart-shaped accents reflect contemporary holiday baking trends that favor whimsical presentation and shareable bites.

Seasonal Adaptations

For a Valentine’s Day variation, use pink gel coloring and red heart sprinkles. For Halloween, switch to orange gel and use candy corn or tiny edible eyes for a spooky look. In warmer months, lighter pastel colors with citrus-flavored chocolate center alternatives (like orange-flavored Kisses) make these suitable for showers or spring gatherings. Adjust bake time minimally if using darker chocolate varieties, as they may absorb heat differently.

Meal Prep Tips

Prepare dough up to the point of scooping and filling, then freeze the dough balls on a baking sheet for 1 hour before transferring to a freezer bag. When ready to bake, place frozen dough balls directly into the mini muffin tin and add an additional 1 to 2 minutes to the bake time. Baked cups can be frozen in a single layer and defrosted as needed for grab-and-go holiday treats.

These tiny cookie cups are easy to personalize, quick to make, and always invite smiles. Make a double batch for parties — they disappear fast — and don’t be surprised if they become part of your seasonal baking tradition.

Pro Tips

  • Keep the Hershey's Kiss upright when placing it into the dough to ensure even chocolate placement during baking.

  • If dough is too crumbly, warm your hands slightly and press to bring the dough together; avoid adding liquid.

  • Cool cookies in the mini muffin tin for at least 10 minutes to set the cup shape before transferring to a wire rack.

  • Freeze formed dough balls on a sheet pan then store in a freezer-safe bag for quick baking later.

This nourishing the grinch cookies recipe is sure to be a staple in your kitchen. Enjoy every moist, high protein slice — it is perfect for breakfast or as a wholesome snack any time.

Tags

Baked Goodsholiday-bakingfamily-recipeschristmas-cookiesgreen-dessertskid-friendlycookie-cups
No ratings yet

The Grinch Cookies

This The Grinch Cookies recipe makes perfectly juicy, tender, and flavorful steak every time! Serve with potatoes and a side salad for an unforgettable dinner in under 30 minutes.

Servings: 18 steaks
The Grinch Cookies
Prep:20 minutes
Cook:12 minutes
Rest Time:10 mins
Total:32 minutes

Ingredients

Main

Instructions

1

Preheat and prepare

Preheat oven to 375°F and prepare a mini muffin tin with baker's spray or paper liners so cookies release cleanly after baking.

2

Color the egg

Whisk the large egg with 3/4 teaspoon green gel food coloring in a small bowl until the color is evenly distributed to avoid streaks in the dough.

3

Combine ingredients

In a large bowl, combine the 17.5-ounce sugar cookie mix, 1/4 cup flour, 1/2 cup room-temperature butter, and the colored egg. Mix on low with a handheld mixer for 2 to 3 minutes until a very thick dough forms.

4

Portion and stuff

Use a 1-1/2 tablespoon scoop to portion dough. Flatten into a 3-inch disk, place one Hershey's Kiss upright in the center, and fold dough around it, shaping into a ball.

5

Bake

Place dough balls in the mini muffin tin, keeping the Kiss upright. Bake at 375°F for 10 to 12 minutes until set but not browned.

6

Finish and cool

Press a heart candy sprinkle onto each warm cookie offset slightly to the right of center. Cool in the tin for at least 10 minutes, then transfer to a wire rack to cool completely.

Last Step: Please leave a rating and comment letting us know how you liked this recipe! This helps our business to thrive and continue providing free, high-quality recipes for you.

Nutrition

Calories: 200kcal | Carbohydrates: 24g | Protein:
2g | Fat: 10g | Saturated Fat: 3g |
Polyunsaturated Fat: 2g | Monounsaturated Fat:
4g | Trans Fat: 1g | Cholesterol: 253mg | Sodium:
0mg | Potassium: 953mg | Fiber: 0g | Sugar:
0g | Vitamin A: 577IU | Vitamin C: 3mg | Calcium:
47mg | Iron: 6mg

Did You Make This?

Leave a comment & rating below or tag
@epicula on social media!

The Grinch Cookies

Categories:

The Grinch Cookies

Did You Make This?

Leave a comment & rating below or tag @epicula on social media!

Rate This Recipe

Share This Recipe

Enjoyed this recipe? Share it with friends and family, and don't forget to leave a review!

Comments (1)

Leave a Comment

0/1000 characters
Food Lover
1 day ago

This recipe looks amazing! Can't wait to try it.

Rating:

Comments are stored locally in your browser. Server comments are displayed alongside your local comments.

Family Photo

Hi, I'm Olivia!

Chef and recipe creator specializing in delicious Baked Goods cooking. Passionate about sharing easy-to-follow recipes that bring families together around the dinner table.

30-Minute Meals!

Join to receive our email series which contains a round-up of some of our quick and easy family favorite recipes.