
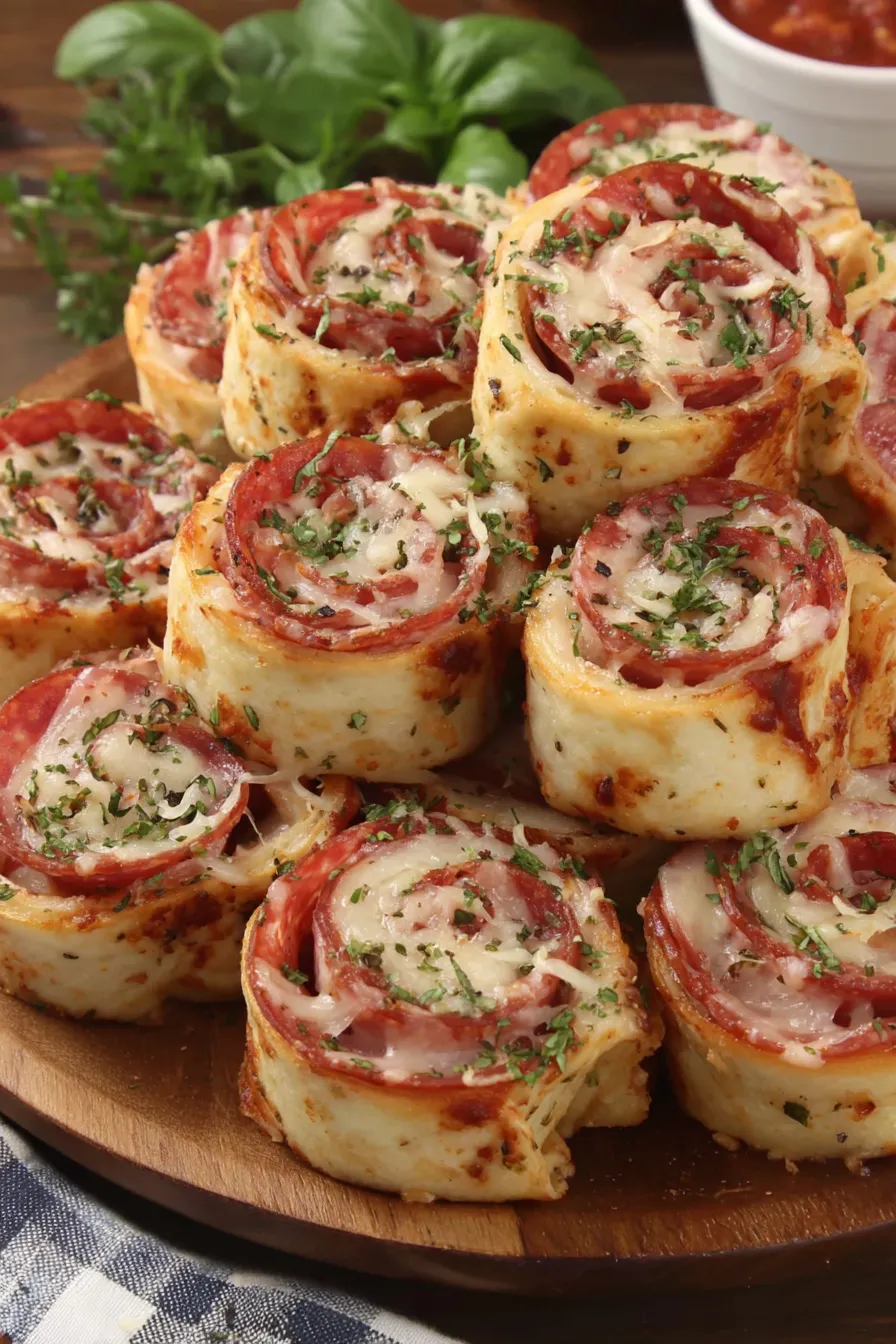
Tortilla Pizza Rolls Bake

Quick, crowd-pleasing pizza rolls made with flour tortillas, pizza sauce, mozzarella and your favorite toppings—ready in about 30 minutes.

Why You'll Love This Recipe
- Ready in about 30 minutes from start to finish, perfect for weeknights or last-minute guests.
- Uses pantry staples—jarred pizza sauce and flour tortillas—so you can make it without specialty shopping.
- Handheld, crowd-pleasing format: easy to pass around at parties, game nights, or for packed lunches.
- Flexible toppings: easily customize for vegetarians, meat-lovers, or spice fans; great for using leftovers.
- Make-ahead friendly—assemble ahead and bake just before serving to keep edges crisp and cheese bubbly.
- Minimal equipment and beginner-friendly technique; no dough rolling required, ideal for cooks of all levels.
I’ve made these dozens of times and the family always asks for them. My kids love helping to spread sauce and place pepperoni, which turns dinner prep into a quick activity. One discovery I made is that a tight roll gives cleaner slices—loose rolls can unravel slightly while baking—so take the extra 15 seconds to roll firmly. Guests always comment on how much these taste like pizza, and I love the simplicity.
Ingredients
- Flour tortillas (4 large): Choose sturdy, burrito-size tortillas (10–12 inches). Brands like Mission or Guerrero hold up well and crisp nicely; thinner tortillas can tear when rolled.
- Pizza sauce (1/2 cup): Use a good-quality jarred sauce (e.g., Rao’s or Classico) or homemade marinara. A thicker sauce prevents soggy centers—if your sauce is very runny, reduce it slightly on the stove first.
- Shredded mozzarella (4 oz / about 1 cup): Pre-shredded or freshly shredded from a block both work; low-moisture mozzarella melts best and yields that stringy, bubbly texture.
- Pepperoni slices or cooked diced ham (2 oz): Standard deli pepperoni is ideal for classic flavor; diced cooked ham gives a milder, family-friendly option.
- Chopped bell peppers (1/4 cup): Use any color for sweetness and crunch—red or yellow add bright color and flavor.
- Dried oregano (1/4 teaspoon): A small sprinkle adds that traditional Italian aroma; use dried basil instead if preferred.
- Olive oil (for brushing, about 1 tablespoon): Just a light brush yields a golden, shiny top and helps crisp the tortilla edges.
- Optional: finely grated parmesan (2 tablespoons): Sprinkle after baking for salty brightness and a slightly granular finish.
- Optional: red pepper flakes: Add to taste for heat.
- Optional: fresh basil leaves: Tuck small leaves on top after baking for freshness and color.
Instructions
Preheat and prepare: Preheat the oven to 375°F and line a baking sheet with parchment paper. Use the middle rack for even heat. Preparing the sheet ahead ensures you can assemble and bake without delay—this helps the tortillas retain structure when sliced. Spread the sauce: Lay each tortilla flat on a clean surface. Using the back of a small spoon, spread about 2 tablespoons to 3 tablespoons of pizza sauce (roughly 1/8 cup) evenly, leaving a 1/2-inch border to avoid overflow when rolling. Too much sauce will make slicing messy and can prevent the exterior from crisping. Add fillings: Sprinkle about 1/4 cup shredded mozzarella evenly over the sauce on each tortilla, followed by pepperoni or diced ham, chopped bell peppers and a light dusting (about 1/8 teaspoon) of dried oregano. Distribute ingredients near the center so each slice carries a balanced bite. Roll tightly and slice: Starting at one edge, roll each tortilla into a tight log, pressing gently as you roll to compact the layers. Using a sharp serrated knife, slice each log into 1-inch (2.5 cm) thick rounds. A serrated blade cuts cleanly through cheese without squashing the roll. If the knife drags, chill logs for 5 minutes to firm up before slicing. Arrange and brush: Arrange the rolls cut-side up on the prepared baking sheet, leaving a small gap between them. Lightly brush the tops with olive oil—this encourages browning and creates those tempting golden highlights. Bake and finish: Bake at 375°F for 10–12 minutes, or until the edges are golden and the cheese is bubbling. Let rest for 1–2 minutes, then garnish with finely grated parmesan, red pepper flakes or fresh basil if using. Serve immediately while warm and gooey.
You Must Know
- These are not freezer-friendly after baking—cheese texture changes after freezing and reheating; however, unbaked rolls freeze well for up to 3 months.
- High in calcium and protein due to cheese, but also moderate in sodium, especially when using cured meats—consider low-sodium or turkey pepperoni for a lighter option.
- Store leftovers in an airtight container in the refrigerator for up to 3 days; reheat in a 350°F oven for 6–8 minutes to restore crispness rather than using a microwave which softens the tortilla.
- Perfect as an appetizer or kid-friendly main—serve with extra pizza sauce or garlic dip for dunking.
My favorite part is watching the cheese bubble through the rolls as they bake; it always signals the moment guests start drifting toward the kitchen. One time at a backyard picnic, a friend guessed they were store-bought—when I told them they took just 15 minutes to assemble they were surprised. That’s the joy: big flavor with minimal fuss, and the ability to tailor each batch for different tastes.
Storage Tips
To keep unbaked rolls for later, arrange them on a tray in a single layer and freeze until firm (about 1 hour), then transfer to a sealed freezer bag for up to 3 months. When ready, place them on a parchment-lined sheet and bake from frozen, adding 3–5 minutes to the baking time. For baked leftovers, cool completely, then refrigerate in an airtight container for up to 3 days. Reheat in a 350°F oven for 6–8 minutes to re-crisp the tortilla—avoid microwaves for best texture. Use shallow, oven-safe containers to avoid sogginess when storing larger batches.
Ingredient Substitutions
If you want to make these vegetarian, omit pepperoni and use sautéed mushrooms, caramelized onions, or roasted zucchini instead. For a gluten-free version, use large gluten-free tortillas—watch baking time as some brands brown faster. Swap mozzarella for provolone or a blend with fontina for a richer melt. Replace olive oil brushing with melted butter for a more savory, golden finish. For dairy-free, use plant-based shredded cheese and a dairy-free parmesan alternative; flavor will shift but the format remains delicious.
Serving Suggestions
Serve warm on a wooden board with small bowls of extra pizza sauce, ranch, or garlic butter for dipping. Pair with a simple green salad or coleslaw to balance the richness, or a light tomato-cucumber salad for freshness. For party platters, alternate meat and vegetarian rolls so guests can choose. Garnish with torn basil leaves and a dusting of parmesan for a pizzeria-style presentation. These also travel well in insulated containers for potlucks or school lunches—pack dips separately to avoid sogginess.
Cultural Background
These rolls are a playful American riff on pizza flavors, combining convenience ingredients like tortillas with classic Italian-American toppings. The concept of rolling flatbreads around fillings can be traced to many cuisines—tortilla wraps from Mexico, pinwheels popular in American hors d'oeuvres, and sushi-style rolls—so this recipe sits at a culinary crossroads. It exemplifies the spirit of home cooking: adapting familiar tastes into easy, shareable formats that fit busy lives while honoring beloved flavors.
Seasonal Adaptations
In summer, amplify freshness with chopped heirloom tomatoes and basil added after baking. In fall, swap bell peppers for roasted poblano and add a pinch of smoked paprika for warmth. Winter calls for heartier fillings—use cooked sausage, caramelized onions and a touch of sage. Around the holidays, add cranberry chutney with brie for a festive twist. Adjust toppings and herbs seasonally to keep the format interesting throughout the year.
Meal Prep Tips
Assemble rolls a day ahead and store covered in the refrigerator; bake just before serving to maintain crispness. For larger batches, freeze unbaked slices on a tray, then transfer to freezer bags—bake from frozen and extend time slightly. Portion into single-serving packs for quick lunches: bake a few and refrigerate, reheating in a toaster oven for convenience. Label freezer bags with the date and bake-from-frozen instructions for effortless weeknight dinners.
These tortilla pizza rolls are a small joy—crisp edges, melting cheese and familiar pizza flavors in a fun portable form. Try them once and you’ll find a dozen ways to make them your own. Gather people, pass the tray, and enjoy the smiles that follow.
Pro Tips
Spread sauce thinly and leave a 1/2-inch border to prevent sogginess when slicing.
Roll tortillas tightly for cleaner slices and to prevent unraveling during baking.
Use low-moisture mozzarella for the best melt and minimal water release.
Brush with olive oil for golden tops; butter creates a richer finish.
If slicing is difficult, chill the rolled logs for a few minutes to firm up the cheese.
This nourishing tortilla pizza rolls bake recipe is sure to be a staple in your kitchen. Enjoy every moist, high protein slice — it is perfect for breakfast or as a wholesome snack any time.
FAQs about Recipes
Can I freeze these?
If you want to freeze them, freeze the unbaked rolls on a tray until firm, then transfer to a freezer bag. Bake from frozen, adding 3–5 minutes to the baking time.
What is the best way to reheat leftovers?
Reheat in a 350°F oven for 6–8 minutes to restore crispness. The microwave will make the tortilla soft and soggy.
How do I slice the rolls without squashing them?
Use a serrated knife and a gentle sawing motion. If your logs are soft, chill them 5–10 minutes to firm up before slicing.
Tags
Tortilla Pizza Rolls Bake
This Tortilla Pizza Rolls Bake recipe makes perfectly juicy, tender, and flavorful steak every time! Serve with potatoes and a side salad for an unforgettable dinner in under 30 minutes.
Ingredients
Base
Filling
Finishing
Instructions
Preheat and line pan
Preheat oven to 375°F (190°C) and line a baking sheet with parchment paper to prevent sticking and aid cleanup.
Spread sauce
Place each tortilla flat and spread about 2–3 tablespoons (approximately 1/8 cup) of pizza sauce evenly, leaving a 1/2-inch border.
Add cheese and toppings
Evenly distribute about 1/4 cup shredded mozzarella, 2 oz pepperoni or diced ham, 1/4 cup chopped bell pepper, and a pinch of dried oregano across each tortilla.
Roll and slice
Roll each tortilla into a tight log and slice into 1-inch (2.5 cm) rounds using a serrated knife. Chill briefly if slices are squashing.
Bake
Arrange rolls cut-side up on the prepared baking sheet, brush lightly with olive oil, and bake at 375°F for 10–12 minutes until golden and cheese is bubbling.
Garnish and serve
Remove from oven, let rest 1–2 minutes, then garnish with parmesan, red pepper flakes, or fresh basil as desired and serve immediately.
Last Step: Please leave a rating and comment letting us know how you liked this recipe! This helps our business to thrive and continue providing free, high-quality recipes for you.
Nutrition
Did You Make This?
Leave a comment & rating below or tag
@epicula on social media!
Categories:
You might also like...

Mississippi Mud Brownies
Ultra-fudgy brownies crowned with toasted mini marshmallows and warm cocoa icing, with molten chocolate pockets in every bite.

Buttery Pecan Pie Bars
Buttery shortbread crust topped with a gooey brown sugar pecan filling. Just 10 minutes to prep for bakery-worthy bars with irresistible crunch.

Crack-Free Pumpkin Cheesecake
Ultra-creamy pumpkin cheesecake with a graham crust, bakes without cracks, and shines with caramel and rum-kissed whipped cream.
Did You Make This?
Leave a comment & rating below or tag @epicula on social media!
Rate This Recipe
Share This Recipe
Enjoyed this recipe? Share it with friends and family, and don't forget to leave a review!
Comments (1)
This recipe looks amazing! Can't wait to try it.
Comments are stored locally in your browser. Server comments are displayed alongside your local comments.

Hi, I'm Olivia!
What's Popular

30-Minute Meals!
Join to receive our email series which contains a round-up of some of our quick and easy family favorite recipes.